


Bug Bounty 101 - A Complete Bug Bounty Roadmap for Beginners (2026)
January 16, 2026
17 min read


If you search “bug bounty” today you will see two extreme opinions:
- “Bug Bounty is Dead”.
- “I made $100k as a beginner”.
Both are misleading.
Bug bounty now is harder than it was in 2018–2020, but it’s far from dead.
What has changed is who succeeds.
In the early days, simply running scanners or testing for basic bugs was enough to get paid, but today programs are more mature, common issues are patched quickly, and automated scanning is already done by the companies themselves.
This means low-effort hunting no longer works very well.
But here’s what most people miss: while security has improved, the attack surface has exploded. Companies are shipping microservices, complex APIs and multi-cloud architectures faster than they can secure them.
Most beginners don’t fail because they lack intelligence. They fail because they copy YouTube payloads without understanding them, hunt massive programs like Google on day one, scan blindly without recon, and switch targets every week.
Bug bounty in 2026 is worth it if you:
- Are willing to focus on one target at a time.
- Can read documentation and actually understand it.
- Enjoy recon and asset discovery.
- Prefer consistency over quick wins.
- Are okay with months of silence before your first solid finding.
That’s exactly why this article exists.
This is not a motivational post telling you to “just be consistent,” and it’s not a recycled list of tools or payloads either. It focuses on how beginners can realistically succeed in bug bounty in 2026: what to learn first, how to choose the right targets, how to do effective recon, and how to hunt with a clear methodology instead of randomness.
Let’s begin with the first point — prerequisites.
The Prerequisites
Before you start hunting, you need a few fundamentals in place.
In earlier articles of this series, I’ve already covered beginner-friendly courses and recon tools, so this section only lists the minimum knowledge you should have before choosing your first target.
Basic Networking Knowledge
You should understand how data moves across the internet:
- DNS, IP addresses, and ports.
- How domains and subdomains work.
- What happens when you visit a website.
- The difference between client-side and server-side.
Many recon and bug classes make no sense without this foundation.
Web Application Fundamentals
You should be comfortable with:
- HTTP requests and responses.
- HTTP methods.
- Headers, cookies, sessions, and tokens.
- Basic status codes.
Basic Coding Awareness
You don’t need to be a full-stack developer, but you should be able to:
- Read and understand basic JavaScript.
- Understand backend logic at a high level.
- Modify parameters and understand their impact.
- Write small scripts if needed.
Core Cybersecurity Concepts
Before hunting, you should understand:
- Common vulnerability types (XSS, IDOR, auth issues, misconfigurations).
- Impact vs severity.
- Why some bugs are accepted and others aren’t.
Documentation, Patience, and Focus
Finally, bug bounty requires:
- Reading scope and rules carefully.
- Testing one target deeply instead of many targets.
- Patience during long periods with no findings.
Once you are ready to hunt, the next challenge is where many beginners struggle - choosing the right first target.
Choosing Your First Target
Choosing the right target is one of the most important parts of bug bounty. Many people quit because they pick bad targets or hunt on too many targets at once.
Most beginners start with huge programs like Google, Meta, Apple — programs with thousands of active hunters. These targets are not impossible for beginners, but the competition is intense.
If you’re starting out, VDPs (Vulnerability Disclosure Programs) are a good option:
- No monetary reward → less competition.
- Higher chance of finding real issues.
- Hall of Fame recognition still matters early on.
You can find VDPs and less-crowded programs on platforms like:
But even the VDPs on these websites has a lot of competition, in that case Google dorks are useful for discovering less-targeted programs. Common examples:
inurl:/securityinurl:security.txtinurl:/responsible-disclosureinurl:/bug bountyinurl:security reward
These often lead to programs that don’t appear on major platforms or aren’t heavily hunted.
Here are some more dorks for reference.
When selecting a target, you also have to keep these points in mind:
- Prefer newer or less popular programs.
- Smaller or focused scopes are easier to approach as a beginner.
- Choose something you can understand as a normal user.
- Web apps and APIs are better than static sites.
Once you’ve picked a target, the next most important thing is to understand the scope. You need to identify the allowed domains, subdomains, APIs, etc. Check for wildcard vs specific assets, and keep a note of what’s out of scope — testing out-of-scope assets wastes time and effort.
Next, read the rules of engagement carefully:
- Are automated scans allowed?
- Any restricted attack types?
- Specific reporting requirements?
Once you’re done choosing a target, you can move on to the most interesting part of bug bounty — and the next section is exactly about that.
Recon Methodology for Beginners
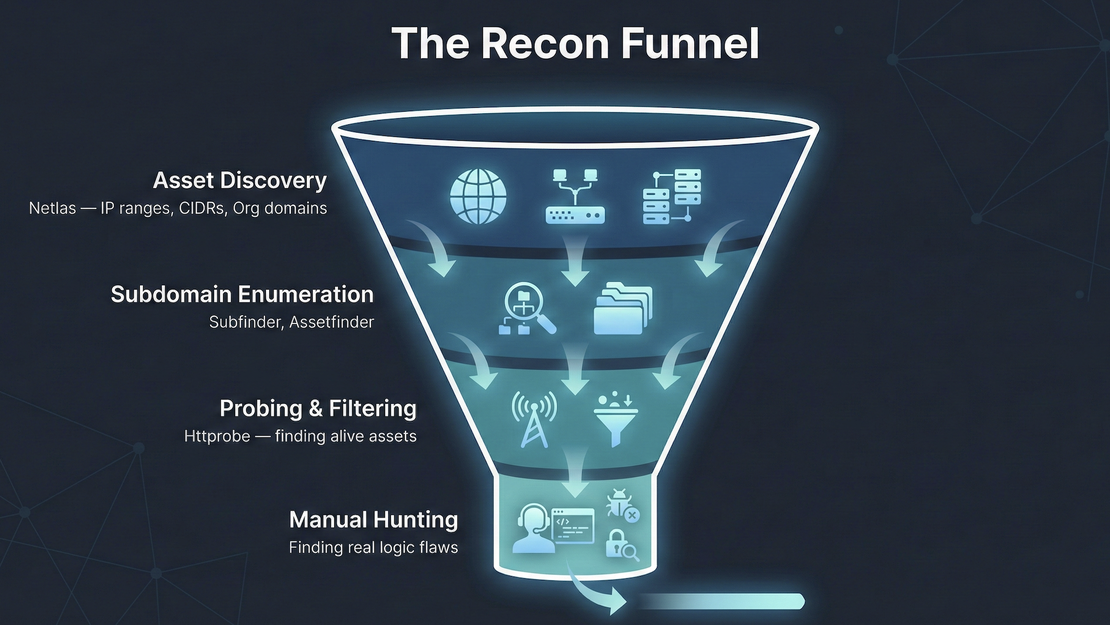
Recon is where most beginners either waste time or gain a real advantage. Scanning blindly without understanding the target almost always leads to duplicates and missed bugs.
Here I’ll walk you through an example recon methodology to help you understand the process better.
Using Netlas for Recon
Netlas is a great tool for bug bounty recon, we are gonna see how to use it for recon with an real example.
Let’s take tesla.com as example target.
First we are going to do a Domain Whois search on Tesla.com to know more about the organization.
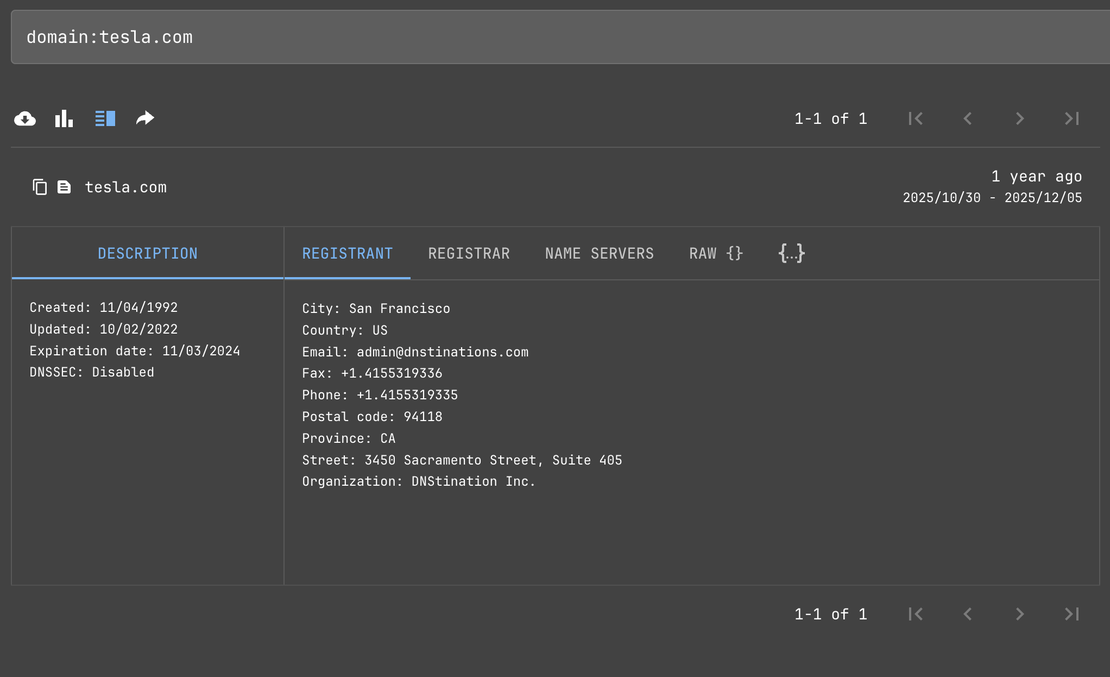
As We can see in the last line - Organization: DNStination Inc.
Now we can use this information to get all the domains under that organization using
registrant.organization:“DNStination Inc.”
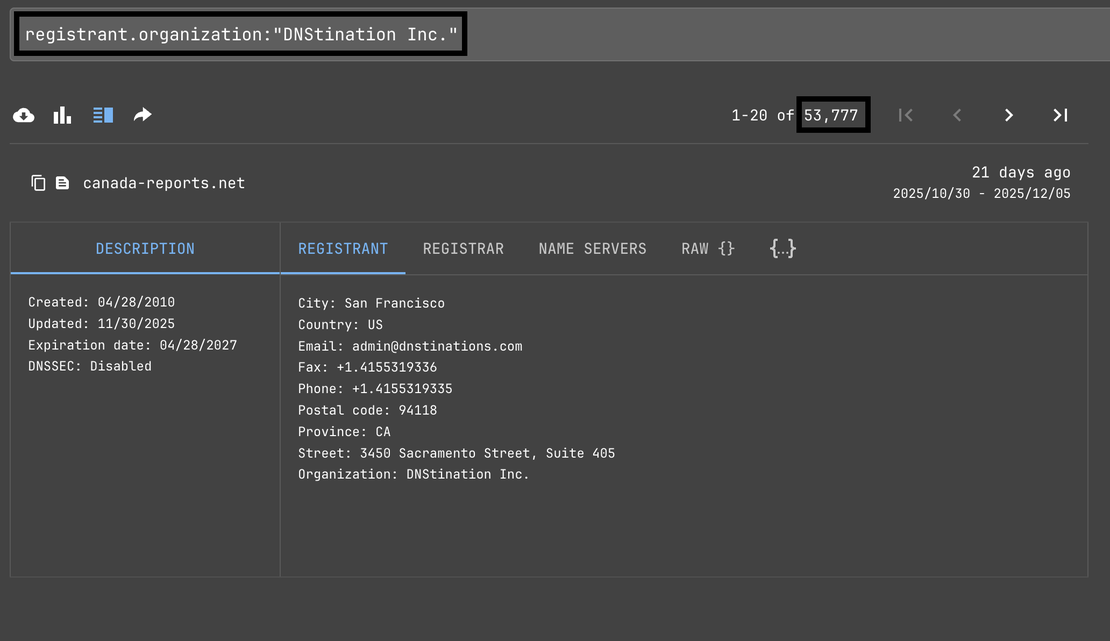
We have got 53,777 results to look into, and we also have filter mapping which could be really helpful during the process.
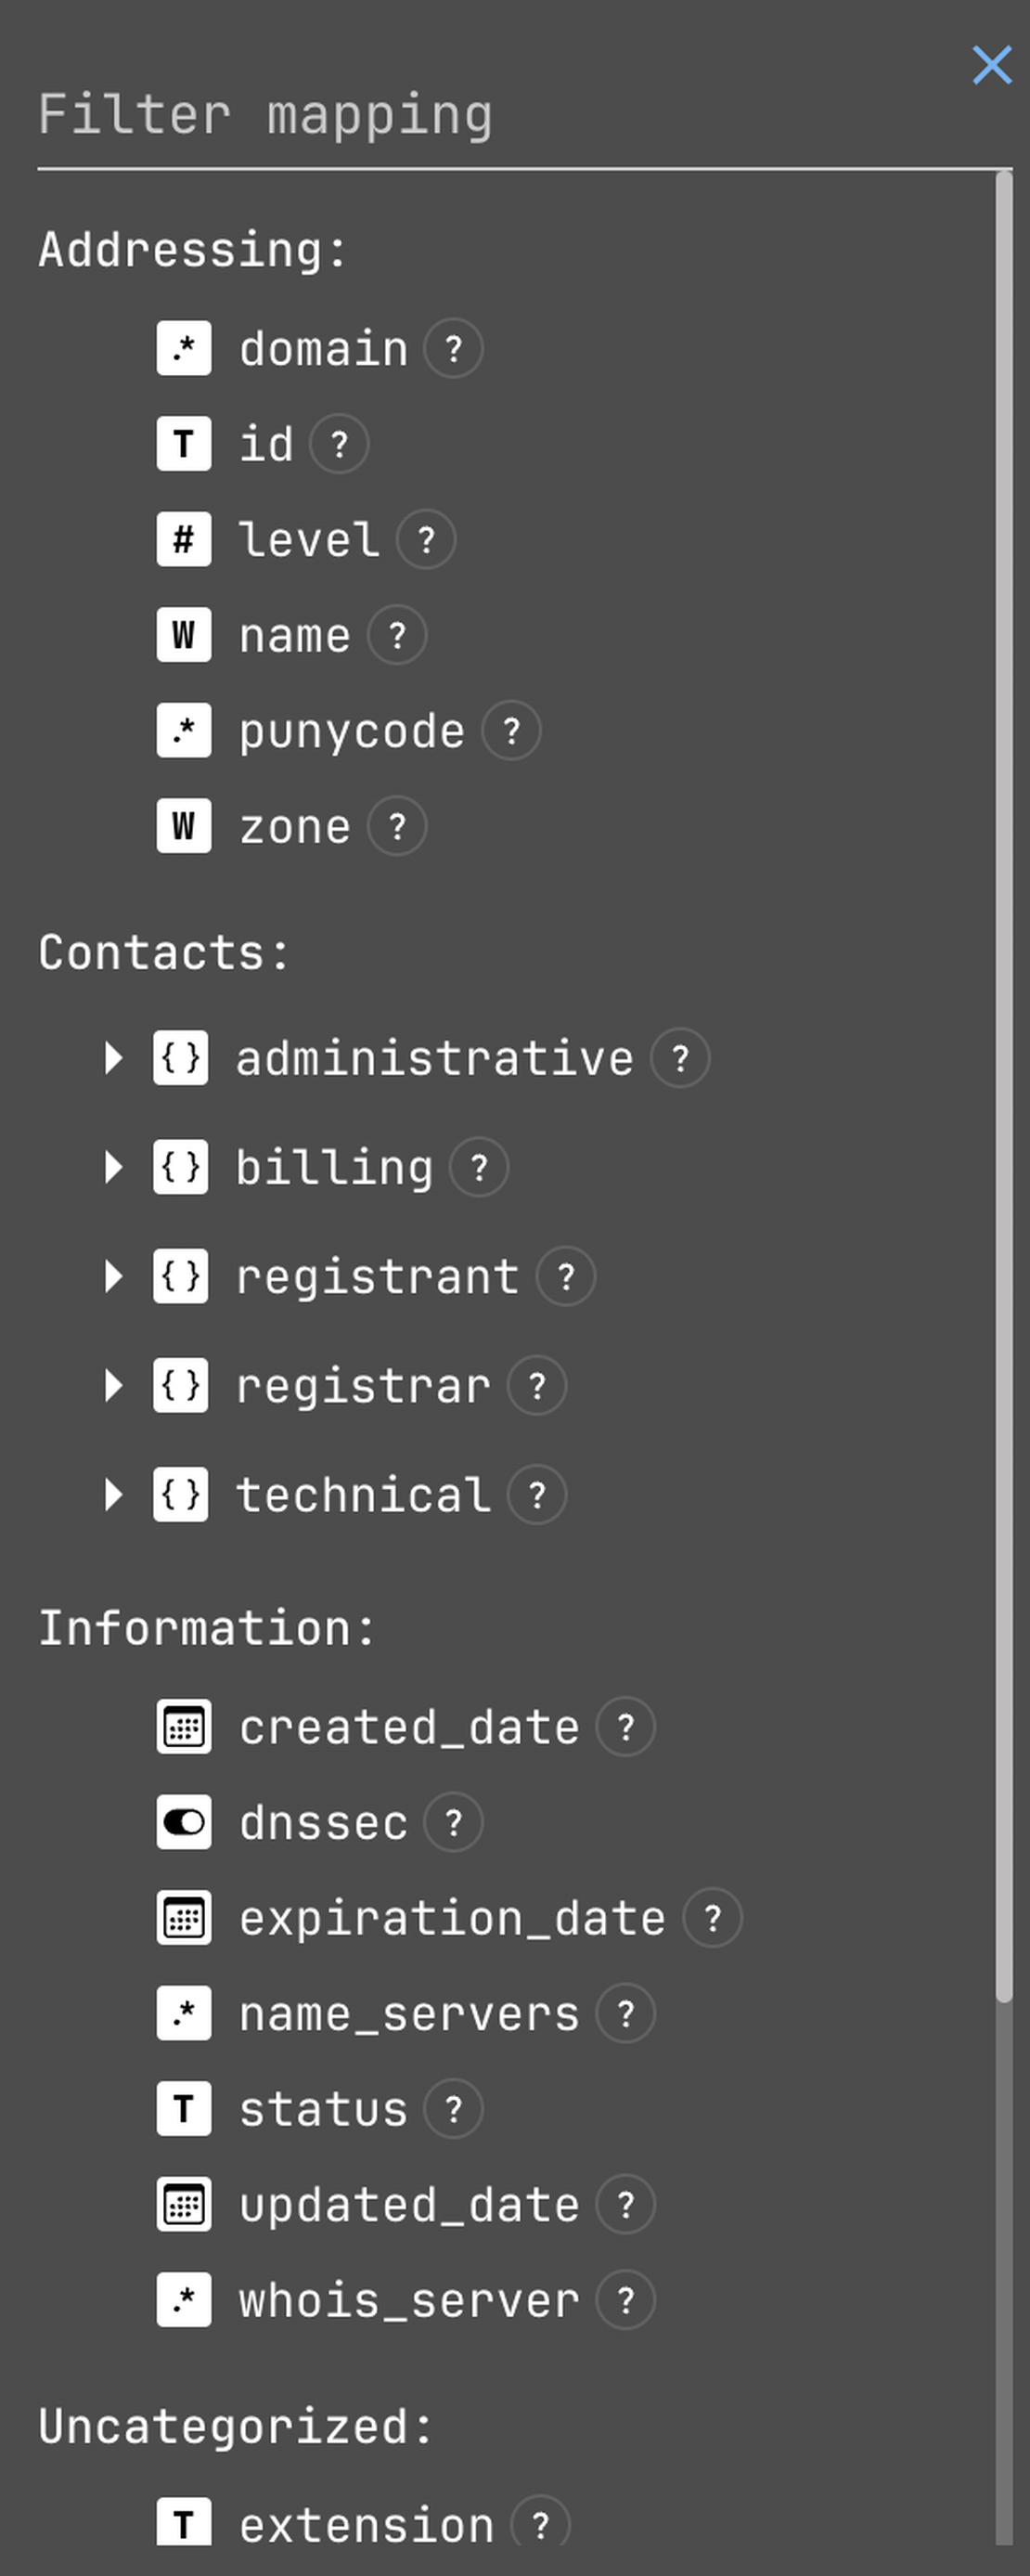
The next thing we are going to need is the subdomains, to find the subdomains you can do a basic search in the DNS Search Tool:
domain:*.target.com

We also have ways to filter them based on levels, and also an inbuilt feature to download all the results, and many other features !
You can play around with these features and create scripts of your own to integrate this with other tools.
We can also do all this stuff in CLI
You can install it through:
sudo apt install netlas
Here you need to save your api key that you can find in the netlas dashboard after you create an account.
And the best thing is that you get 50 requests for free everyday and upto 200 results per download.
Now let us see how we can utilize some other tools for our recon process:
Step by Step Process
Step 1: Understanding the Scope
Never skip reading the policy. If the scope is .target.com, your goal is to map every single pixel of that domain.
Step 2: Subdomain Enumeration
I don’t rely on just one tool. I use a multi source approach to ensure that I don’t miss anything.
Passive Discovery: I run a combination of tools to gather every possible subdomain:
assetfinder --subs-only target.comsubfinder -d target.comfindomain -t target.com- Tools Used - Assetfinder, Subfinder, Findomain
Cleaning the Data: Use anew to merge everything into a single, unique list: cat subdomains/*.txt | anew unique_subs.txt
Step 3: Probing for Life
A list of 1,000 subdomains is useless if you don’t know which ones are actually running a web server.
Filtering:
cat unique_subs.txt | httprobe | tee -a alive.txtVisual Recon: I use Aquatone. It takes a screenshot of every alive subdomain and generates an HTML report. Instead of clicking 100 links, I just scroll through the screenshots to find interesting login panels, 403 pages, or old-looking UI.
Step 4: Tech Stack & The “Triple N” Scanner
Once I find an interesting target, I need to know more about it.
Wappalyzer: I use the browser extension to see the CMS, language, and server (e.g., Nginx 1.14).
The Triple N (Automation):
Step 5: Hunting Low-Hanging Fruit
While the deep bugs take time I always check for these low hanging fruits first:
Subdomain Takeover: Using subzy to see if any subdomain points to a dead service (like a deleted Shopify or Zendesk account).
Broken Link Hijacking: Using socialhunter to find social media icons on the site that link to non-existent Twitter or Instagram handles.
Quick XSS: I use ParamSpider to find URLs with parameters and then a simple
curlloop to see if my payload is reflected.
Step 6: Deep URL Mining & Dorking
Finally, I dig into the history of the site.
**Wayback Machine:** Use
waybackurlsto find old JS files, hidden API endpoints, or configuration files that used to be public.Google Dorking: use the Bug Bounty Search Engine to quickly search for
site:target.com ext:logorsite:target.com inurl:admin.GitHub Recon: Search GitHub for “target.com” + “password” or “API_KEY”. Developers often accidentally commit secrets to public repositories.
Request Your Free 14-Day Trial
Submit a request to try Netlas free for 14 days with full access to all features.
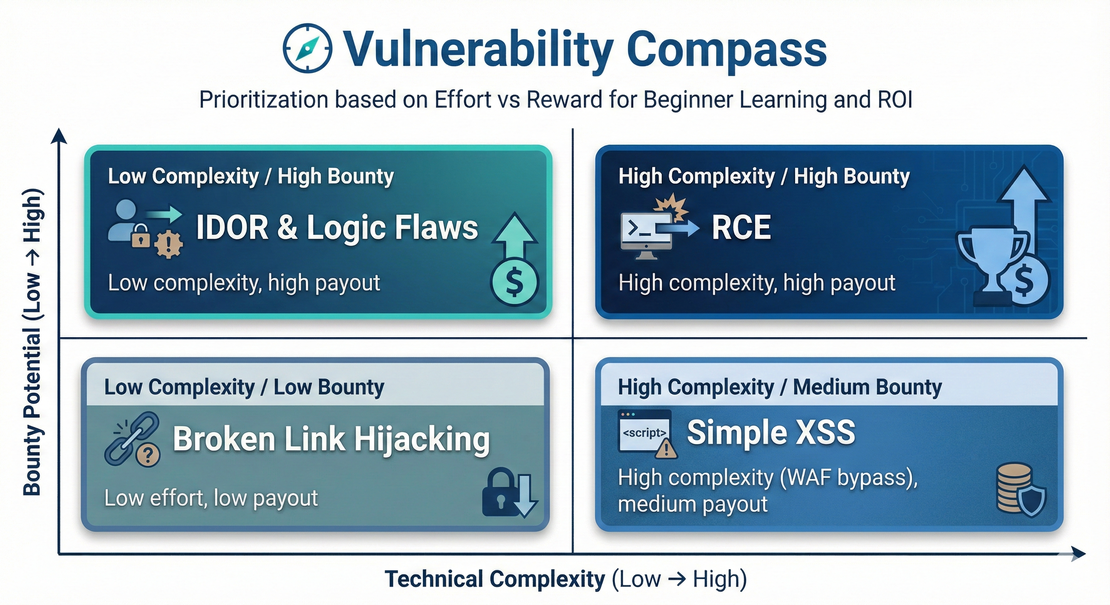
The Vulnerabilities Every Beginner Should Start With
When you’re starting out, the large number of vulnerability types can be overwhelming. Instead of trying to master every complex exploit, I recommend focusing on these specific bugs. They are often considered beginner-friendly because they are logically straightforward, easy to verify manually and frequently appear in bug bounty programs.
Insecure Direct Object Reference (IDOR)
IDOR is a type of access control vulnerability that occurs when an application uses user-provided input to access objects directly. It is one of the most common bugs for new hunters because it relies on human logic rather than complex coding.
The Scenario: You log in and see your profile at
example.com/api/v1/user/1234.The Test: You change the ID to
1235. If the server returns the private data of another user, you’ve found an IDOR.Tip: Always test this by creating two accounts (User A and User B) to prove that User A can see User B’s private information.
Cross-Site Scripting (XSS)
XSS is one of the most common vulnerability types in bug bounty hunting. It occurs when an application includes untrusted data in a web page without proper validation or escaping.
What to look for: Focus on reflected XSS. Look for search bars, “Contact Us” forms or URL parameters that display your input back to you on the page.
The Test: Use a simple, non-intrusive payload like
<u>Test</u>. If the word “Test” appears underlined in the browser, the page is rendering your HTML, which indicates a vulnerability.
Information Disclosure & Sensitive Files
This category is all about finding data that was never meant to be public. This is where your recon and dorking skills really come in place.
Common Finds: Exposed
.envfiles (containing API keys),.gitdirectories (leaking source code), orphpinfo()pages (revealing server configurations).Search Strategy: Use tools like Netlas or Google Dorks to find “forgotten” files on subdomains that the developers might have neglected.
Subdomain Takeover
This happens when a subdomain points to a third-party service (like GitHub Pages, Heroku or Zendesk) that has been deleted or expired, but the DNS record remains.
- As an attacker, you can claim that “dead” service and host your own content on the company’s official subdomain.
- Using a tool like
subzylets you quickly check your list of subdomains for “fingerprints” of services that are vulnerable to being claimed.
Broken Link Hijacking
This is a relatively simple bug but very effective. It occurs when a website links to a social media account (like a Twitter or YouTube profile) that no longer exists or hasn’t been claimed yet.
- The Test: Click on the social media icons in the footer of a target’s website. If it leads to a “This account does not exist” page on Twitter, you can potentially register that handle and “hijack” the traffic from the main site.
My Real Bug Hunting Methodology
Once the automated tools have finished their run and you’ve mapped out the subdomains, the real manual work begins. While automation finds the low-hanging fruit, manual testing finds the critical logic flaws that scanners simply cannot understand.
In this section, I’ll walk you through my exact step-by-step process — from setting up your environment to breaking every feature of an application.
Step 1: Setting Up the Proxy
Before you touch a single button, you need to see what’s happening behind the scenes. A proxy server acts as a gateway between your browser and the internet.
I use Burp Suite Community Edition (which is free and powerful). You can download it directly from PortSwigger. Once installed, you have two options for routing traffic:
Burp’s Embedded Browser: Go to the Proxy tab -> Intercept -> Open Browser.
External Browser: If you prefer using Firefox or Chrome, you’ll need to configure your browser to point to
127.0.0.1:8080and install the Burp CA Certificate so you can intercept HTTPS traffic.
Step 2: Getting to Know the Application
Most beginners make the mistake of jumping straight into attacking. Instead, you should start by using the website exactly like a normal user.
1. Create a Baseline of Knowledge: Register an account, verify your email, and click every single button. Read the documentation or manual if it exists. Your goal is to understand the application properly.
**2. While I’m exploring, I keep one specific payload ready in my clipboard. Every time I see an input field—whether it’s a search bar, a profile name, or a comment section—I enter:
‘”`><img src=x>${7*7}
This single string is a “test for everything”:
‘”tests if I can break a SQL query (SQL Injection).><img src=x>tests if the page renders my HTML (XSS).${7*7}is a signal test for template rendering.
3. Note-Taking: You cannot hunt effectively if you do not stay organized. Use apps like Obsidian, Notion, or CherryTree. I create a list of every single functionality. For example, if I were testing a platform like instagram, my notes would look like this:
- Authentication: Social login, Password reset, 2FA, changing username/personal info.
- Content: add story, Edit post, Delete post, Commenting, etc.
- Commerce: Buying subscription, Paying for Blue tick, etc.
Step 3: The Manual Testing Checklist
Now that you know how the app works, it’s time to try and break the logic. I follow the OWASP WSTG Checklist and focus on these nine areas:
1. Entry Points & Input Data Validation
This is where you look for common Injections. Check every search box, comment section, feedback form, and even Cookies.
- Tests: Reflected/Stored XSS, SQL Injection, OS Command Injection, and CSRF (Cross-Site Request Forgery).
- Method: Send the request to Burp Repeater, change the parameter value, and see how the server responds.
2. Session Management
Cookies are a very important part of any application. If you can steal or predict a session cookie, you can become any user.
- The Flags: Check if the
SecureandHttpOnlyflags are present. - Session Invalidation: When you click “Logout,” does the session actually die? Try going back to a previous page or re sending a sensitive request in Burp. If it still works the session wasn’t properly invalidated.
3. Authentication & Login
- Bypass: Can you log in by entering
' OR 1=1--? - User Enumeration: Does the “Login Failed” message change if you use a real username vs. a fake one? If the app says “Invalid Password” for an existing user but “User not found” for a fake one, you can enumerate the entire user database.
- OAuth: If they use “Login with Google,” look for vulnerabilities in the redirect URI.
4. Forgot Password Flow
- Predictability: Are the reset tokens short or predictable?
- Email Change: if you change your email, does it invalidate the old sessions?
- Token Leakage: Is the reset token being leaked in the Referer header to third-party sites ?
5. My Account & Profile
IDOR (Insecure Direct Object Reference): This is my favorite. If your profile URL is
/user/view?id=100, change it to101. If you see someone else’s private details, you’ve found a high-severity bug.CSRF: Can you craft a hidden HTML form that, when clicked by another user changes their email address to yours?
6. Product Purchase & Payment Logic
If the app has a cart or “Buy” button, focus here.
Price Manipulation: Intercept the “Add to Cart” request. If you see
price=100.00, try changing it to0.01.Negative Values: What happens if you try to buy
-5items? Does the total price become negative? Some older systems would actually refund you the difference.
7. Error Handling
Errors can be a roadmap for an attacker.
Fuzzing: Inject special characters like
*^&$#@!into parameters.Information Leak: Does the error message show the database type, the internal file path (e.g.,
C:\inetpub\wwwroot...), or the server version? This is valuable info for further attacks.
8. Access Control (Privilege Escalation)
Horizontal: Can you access data belonging to a user at your same level?
Vertical: Can you access
/adminor/settings/billingas a regular “Guest” user just by typing the URL into the browser?
9. Broken Link Hijacking
Check every social media icon in the footer. If they link to a Twitter account like @TargetSupport and that account doesn’t exist yet, you can register it yourself. This is a “Broken Link Hijack” and is a valid report for many programs.
Writing High-Quality Bug Reports That Get Accepted
You’ve done the hard part. You’ve scanned the target, mapped the attack surface and found a valid vulnerability. But here’s the truth: if you can’t communicate the bug, you won’t get paid. Many beginners lose thousands of dollars in bounties not because their bugs weren’t real, but because their reports were messy, unclear or failed to show the actual risk. A bug report is essentially a professional sales pitch to a security engineer.
The Anatomy of a Good Report
A professional report follows a strict, logical structure.
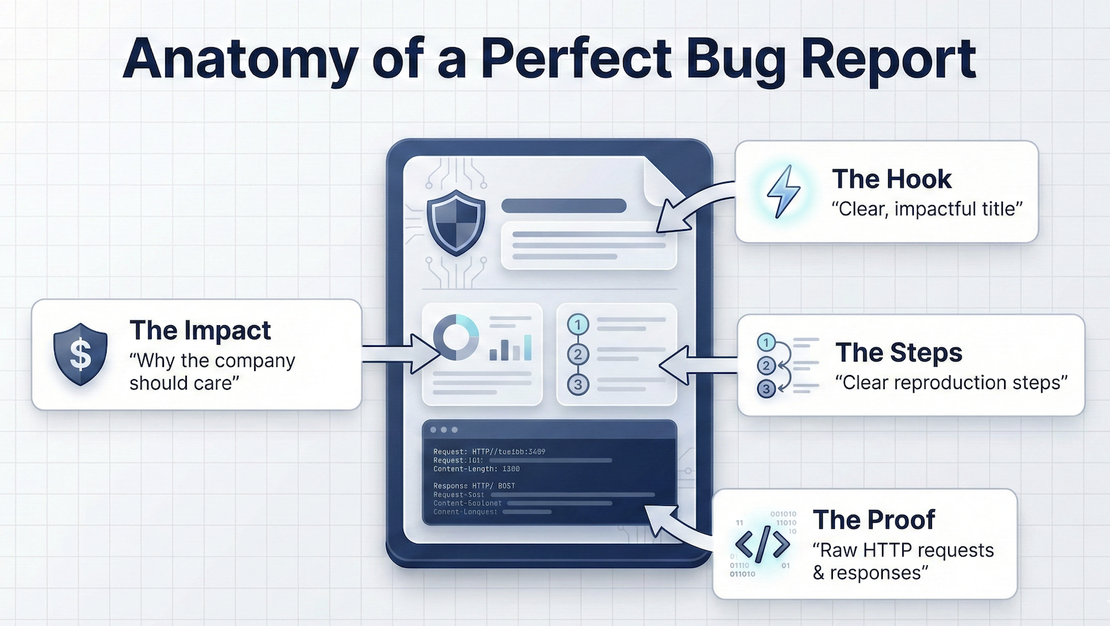
1. The Title
The title should be concise and descriptive. It should immediately tell the triager what the bug is and where it is.
Bad: “XSS Found” or “Bug in profile page”
Good:
[Stored XSS] on [example.com] via [First Name] parameter in /settings/profile
2. The Executive Summary
Write this for a manager who might not be as technical as you. In 2–3 sentences, explain the vulnerability and the immediate danger it poses to the company.
3. Technical Description
This is where you dive into the “how.” Explain the root cause. For an IDOR, for example, explain that the server fails to check whether the session_id of the requester matches the owner_id of the requested resource.
4. Step-by-Step Reproduction (The Most Important Part)
If a triager cannot reproduce your bug in 5 minutes, they will likely mark it as “Needs More Info” or “Informational.” You must be incredibly specific. Let’s see an example for an IDOR -
- Navigate to
https://target.com/login. - Log in with account
User_A. - Go to
https://target.com/dashboard/settings. - Capture the request to
/update_emailin Burp Suite. - Change the
user_idparameter from123to124. - Observe that the email for
User_B(ID 124) has been changed without authorization.
5. Impact Analysis
Don’t just say “I can see data.” Tell them why that data matters.
- Does it lead to Account Takeover?
- Does it expose Personally Identifiable Information (PII)?
- Can it be used to escalate privileges from a guest to an admin?
Supporting Evidence: Proof of Concept (PoC)
Never submit a report without visual proof.
Screenshots: Use an annotation tool to draw boxes around the vulnerable parameter and the successful reflection/response.
Video PoC: For complex bugs like CSRF or multi-step account takeovers, record your screen. Keep it under 2 minutes and don’t include background music or unnecessary typing.
HTTP Logs: Copy and paste the raw Request and Response from Burp Suite into a code block. This allows the engineer to see the exact headers and body you used.
Some Tips for Professional Communication
Be Respectful: Don’t treat the triager as an enemy. Even if they disagree with your severity rating, remain professional.
Don’t Beg for Bounties: Avoid phrases like “Please give me a high bounty, I am a student.” Your work should speak for itself.
Self-Triage: Before hitting submit, ask yourself: “If I were the developer, could I fix this bug based only on this report?” If the answer is no, keep writing.
Beginner Mistakes That Waste Months
Most beginners quit not because they lack hacking skills, but because they fall into productivity traps that exhaust their motivation.
In 2026, with more automation and more hunters than ever, avoiding these mistakes is what separates professionals from hobbyists.
1. The Automation Trap
Many beginners think that if they run Nuclei, SQLmap, or Burp Scanner across a thousand subdomains, they will wake up to a dashboard full of bounties.
The Reality: every professional program is already running these same scanners. If a tool found it in 5 seconds, it’s already been reported.
The Fix: Use tools to assist your recon, but do your testing manually. Automation is for scale and humans are for logic.
2. Copying Payloads Blindly
It’s tempting to grab a Top 100 XSS Payloads list from GitHub and use them in every input box.
The Reality: Modern Web Application Firewalls (WAFs) are designed to catch these common payloads. When you use them, you aren’t hacking you’re just alerting the company’s security team to block your IP.
The Fix: Understand why and how a payload works. Instead of
alert(1), try to inject<u>test</u>to see if HTML is even allowed. Build your payload based on what the application is reflecting.
3. Chasing High Bounties on Hard Targets
It’s natural to want to hunt on Facebook, Google, or Apple because they pay $10,000+.
The Reality: These companies have world-class security teams and have been tested by the best hackers for a decade. As a beginner, you are likely to spend 100 hours and find nothing, leading to burnout.
The Fix: Instead start with VDPs (Vulnerability Disclosure Programs) or small companies on HackerOne/Bugcrowd. These targets are fresh, have fewer hunters, and are far more likely to yield your first valid finding.
4. Ignoring the Scope Documentation
This is the most common reason for a “N/A” (Not Applicable) or “Informational” rating.
The Reality: You might find a perfect SQL Injection on
dev.target.com, but if the policy says only .main-target.com is in scope, you won’t get paid.The Fix: Spend 15 minutes reading every word of the policy. Note the Out of Scope section and the Qualifying Vulnerabilities list before you send a single packet.
5. Switching Targets Too Often
Beginners often spend 2 hours on one target, find nothing, and immediately switch to another.
The Reality: The most successful hunters are those who stay on a single target for weeks until they understand the application better than the developers who wrote it.
The Fix: Commit to a target for at least 7 days. If you find yourself bored, it usually means you aren’t looking deep enough into the JavaScript files or API endpoints.
6. Misunderstanding Business Impact
A bug is only a bug if it hurts the business. Reporting that “the server version is visible in headers” is technically a finding, but it has zero impact on a company’s security.
- The Fix: Always ask: “What can an attacker actually do with this?” If you can’t use a bug to access data, bypass a payment, or take over an account, it’s likely not worth reporting yet.
A Practical 60-Day Bug Bounty Beginner Roadmap
The biggest problem beginners face is not a lack of resources, but a lack of structure. You don’t need to learn everything at once. Here is an 8-week plan to move you from zero to your first valid finding.
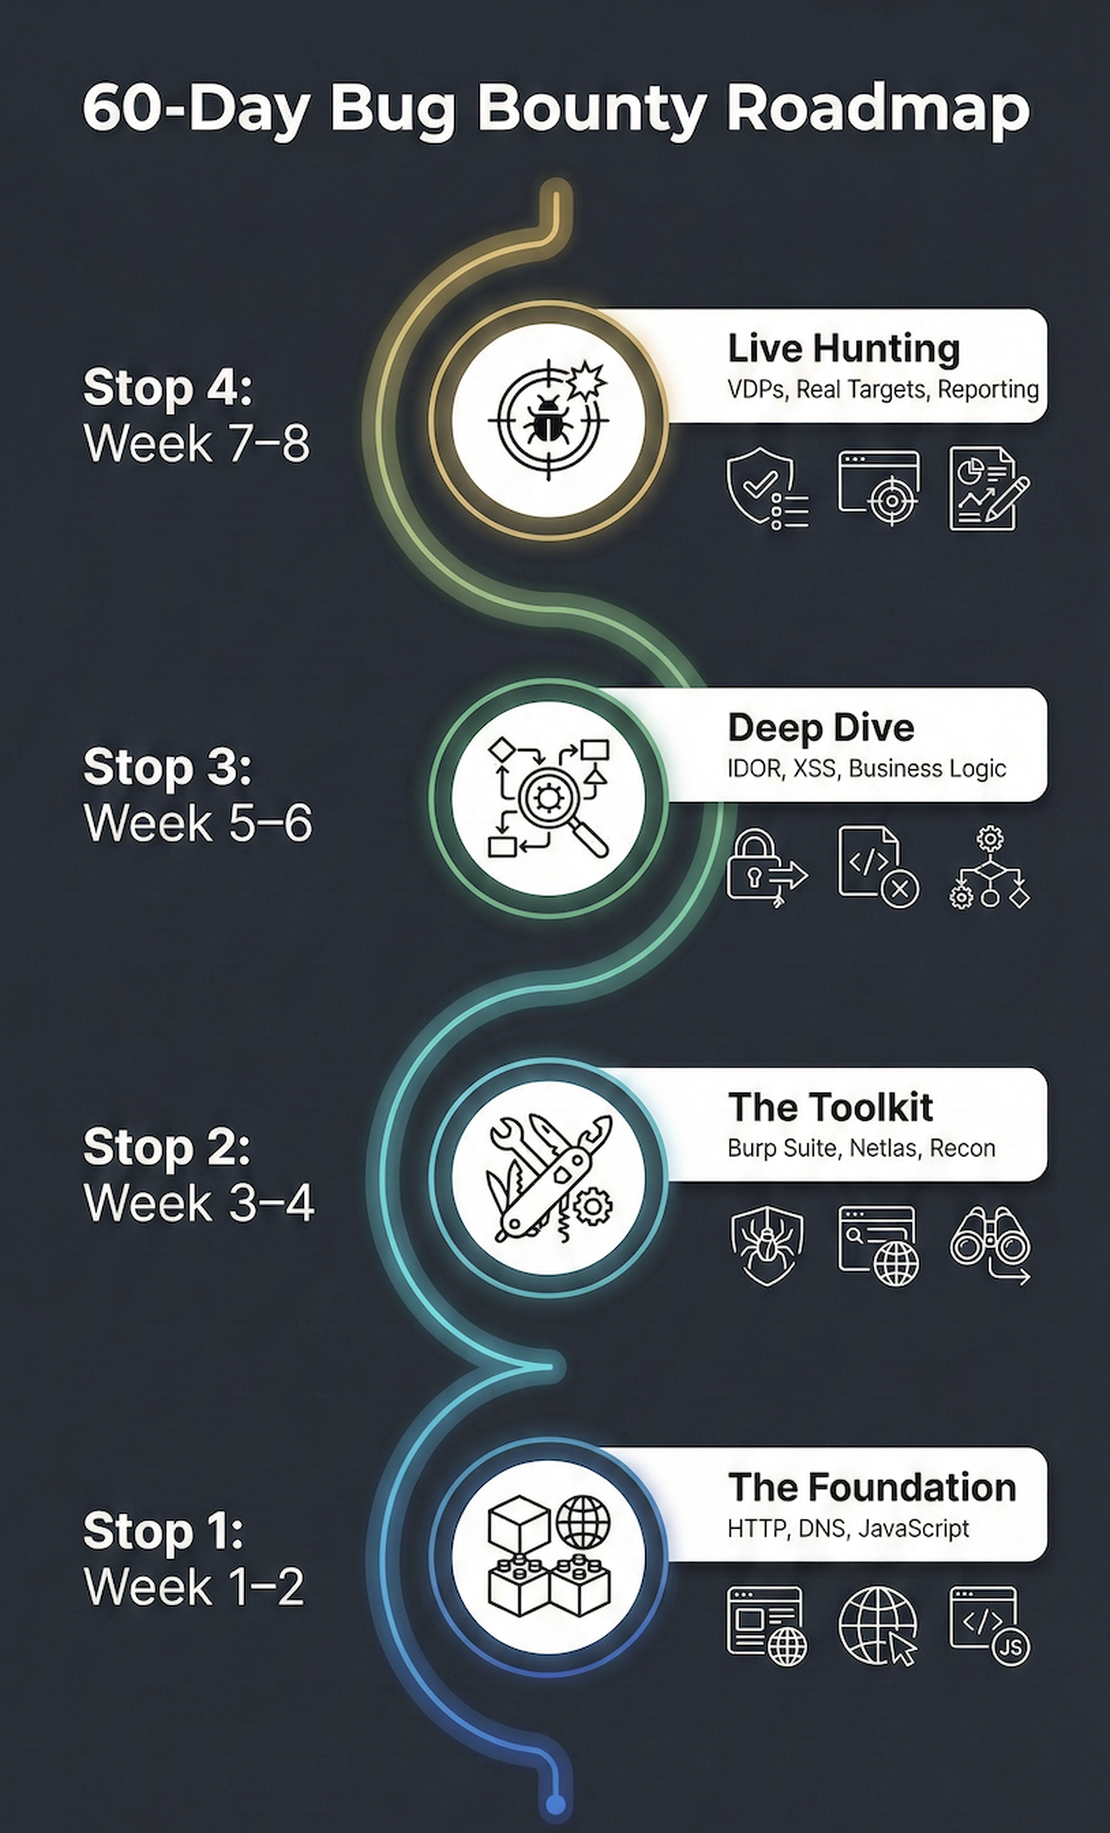
Phase 1: The Foundations (Week 1–2)
Goal: Understand how the web actually works.
Tasks: Learn the HTTP Protocol: Methods (GET, POST, PUT, DELETE), Status Codes (200, 301, 403, 404, 500), and Headers.
Study JavaScript Basics: You don’t need to be a developer, but you must be able to read code to find DOM-based XSS or hidden API endpoints.
Networking: Understand DNS, IP addresses, and Ports.
Complete the “Web Security Academy” by PortSwigger (The free labs).
Phase 2: Mastering the Tools (Week 3–4)
Goal: Get comfortable with the common tools
Tasks: Burp Suite: Master Repeater, Intruder, and the Proxy history. Learn how to manually modify requests.
Recon Tools: Practice with
subfinder,httpx, andnuclei.Search Engines: Learn Google Dorking and use Netlas.io to find certificates and exposed assets that aren’t indexed by Google.
Phase 3: The Vulnerability Deep Dive (Week 5–6)
Goal: Become an expert in 3–4 specific bug classes.
Tasks: Pick some easy bugs like IDOR, XSS, and Information Disclosure. Read at least 50 public reports on HackerOne (Hacktivity) for each.
Practice these specific bugs on platforms like TryHackMe or HackTheBox (the “Bug Bounty Hunter” path).
Exercise: Write a manual checklist for each bug type so you never skip a test case during live hunting.
Phase 4: Live Hunting & Community (Week 7–8)
Goal: Find your first “Live” vulnerability.
Tasks: Choose a VDP (Vulnerability Disclosure Program). These programs don’t pay money, but they provide Reputation Points, sometimes Hall of Fame, and are much easier for beginners to get started on.
Spend at least 2 hours a day on a single target. Don’t switch!
Reporting: If you find anything, write a high-quality report using the structure we discussed earlier.
Conclusion: Advice I Wish I Had Known
When I started my journey, I thought bug bounty was about being the smartest person in the room. I was wrong.
Bug bounty is about being the most persistent person in the room.
If I could go back and give myself advice on Day 1, it would be this:
Don’t ignore the basics. You can’t hack what you don’t understand.
Reputation is more valuable than money. Early in your career, focus on building a clean profile with high-quality reports. The money will follow.
Collaborate. Join Discord communities and follow researchers on Twitter. This can be a lonely hobby, but you will learn 10x faster when you talk to others.
Take breaks. Your best bugs will often come to you while you’re away from the keyboard, after your brain has had time to process the logic you were staring at.
2026 will be a massive year for cybersecurity. The attack surface is expanding and companies need your eyes on their code. Follow this roadmap, stay consistent, and I look forward to seeing your name on a Hall of Fame soon.
Happy hunting!

I can show you how deep the Internet really goes
Discover exposed assets, infrastructure links, and threat surfaces across the global Internet.
Related Posts

September 12, 2025
Bug Bounty 101: Top 10 Reconnaissance Tools

August 13, 2025
Bug Bounty 101: The Best Courses to Get Started in 2025

June 10, 2025
How to Detect CVEs Using Nmap Vulnerability Scan Scripts

June 19, 2025
Nmap Cheat Sheet: Top 10 Scan Techiques

June 14, 2025
Domain Recon: Must-Know Tools for Security Professionals

June 25, 2025
theHarvester: a Classic Open Source Intelligence Tool