


Proactive Threat Hunting: Techniques to Identify Malicious Infrastructure
March 17, 2026
12 min read


Malicious actors rely on a range of technical assets, known as adversary infrastructure, to carry out their operations. In this article, I will demonstrate how to hunt for the key components of such infrastructure – command-and-control (C2) servers, which are used for malware distribution, communication, and data exfiltration.
Our primary goal is to learn how to find distinct fingerprints that remain consistent across deployments. These may include favicon hashes, HTTP headers, TLS certificate fields, web page titles, and hash values of the HTTP response body. While not infrastructure in themselves, these artifacts are tightly linked to how infrastructure is configured and are essential for detection and correlation.
Malicious infrastructure hunting involves identifying, analyzing, and pivoting across these technical indicators to uncover related systems controlled by threat actors. By doing so, defenders can map attacker ecosystems, block future attacks proactively, and strengthen threat detection far earlier in the attack lifecycle.
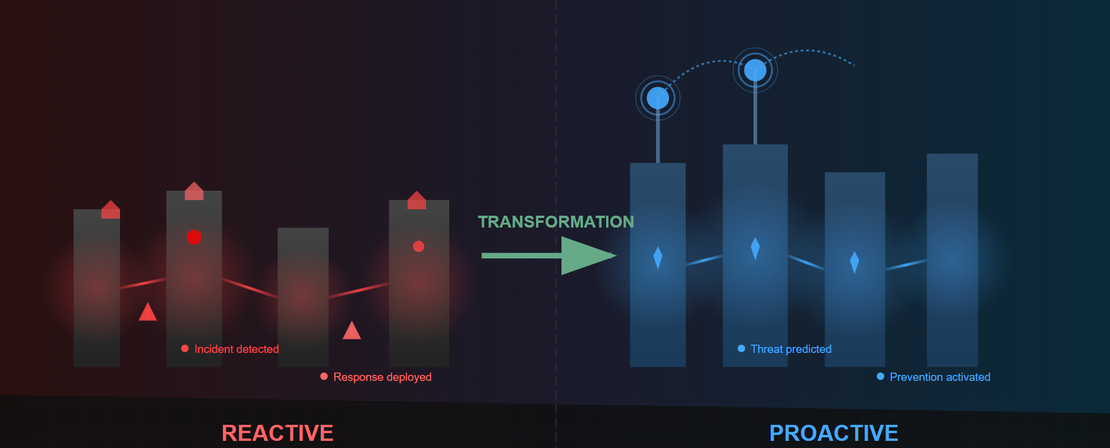
From Reactive to Proactive: The Shift in Threat Detection
Traditional threat detection tends to be reactive – alerts are triggered once an attack has begun or after a compromise has occurred. Indicators like file hashes, malicious URLs, or command-and-control traffic are flagged only after they’ve been observed in an active attack.
Malicious infrastructure hunting changes this approach. By proactively monitoring the attacker’s supporting infrastructure, defenders can detect threats earlier, often before any payload is delivered or a connection to a victim is made.
This shift offers several key benefits:
- Early Detection: Infrastructure elements are often set up and tested before launch. Identifying them enables defenders to take action in the pre-attack phase.
- Wider Visibility: Infrastructure reuse across campaigns reveals attacker patterns, helping to uncover related threats.
- Faster Response: Blocking or monitoring suspicious infrastructure limits its reach and shortens the attacker’s window of effectiveness.
- Improved Attribution: Clustering infrastructure, based on the threat hunting methods described below, facilitates the linking of activity to known threat actors or malware families.
Moving from reactive detection to proactive hunting equips organizations with the context and foresight needed to stay ahead of evolving threats, rather than just responding to them.
Recommended Reading
The Pyramid of Pain: Beyond the Basics

Techniques for Hunting Malicious Infrastructure
Malicious infrastructure hunting often begins with a known indicator of compromise (IoC) – such as an IP address, domain name, or hash – collected from threat intelligence reports, threat feeds, or community platforms like X (formerly Twitter). In some of the case studies discussed in this post, IoCs were gathered from platforms like X and SSL Blacklist (a project of Abuse.ch), which then served as pivot points to uncover related infrastructure.
This article demonstrates how to expand a single C2 IoC into broader threat hunting by fingerprinting it and leveraging IoT search engines such as Shodan and Netlas to uncover related C2 infrastructure. We will learn to analyze TLS certificates, HTTP headers and titles, favicon or body hashes, JARM fingerprints, and artifacts found in the source code of offensive tooling to search for C2 instances.
In the following subsections, we’ll break down these techniques with practical examples to illustrate how they can be applied effectively in real-world hunting scenarios.
Using multiple search engines like Netlas, Shodan, and Censys provides broader visibility because each platform uses different scanning techniques, infrastructure placements, and indexing schedules. This diversity helps reduce blind spots, catch assets missed by a single engine, and increase the chances of uncovering hidden or overlapping C2 infrastructure.
Although this article was originally posted on the Netlas blog, the Netlas team specifically asked me to demonstrate how combining different search engines can enhance threat hunting outcomes.
Seeing is Believing
See how Netlas can elevate your threat analysis. Book a quick demo with our team.
Leveraging HTTP Headers, Titles, and Body Hashes for Infrastructure Hunting
Adversary infrastructure often exposes unique, recurring HTTP characteristics, ranging from response headers and page titles to the full content of the HTTP body. These artifacts may include uncommon header combinations, such as:
- WWW-Authenticate and Access-Control-Allow-Methods
- custom 404 pages
- open directory listings
- static HTML used by control panels and malware stagers.
Since many threat actors reuse configurations or payload templates across multiple servers, defenders can use these traits to build powerful fingerprinting queries, effectively expanding known infrastructure into broader clusters.
Case Study 1: Discovering SectopRAT C2 Servers
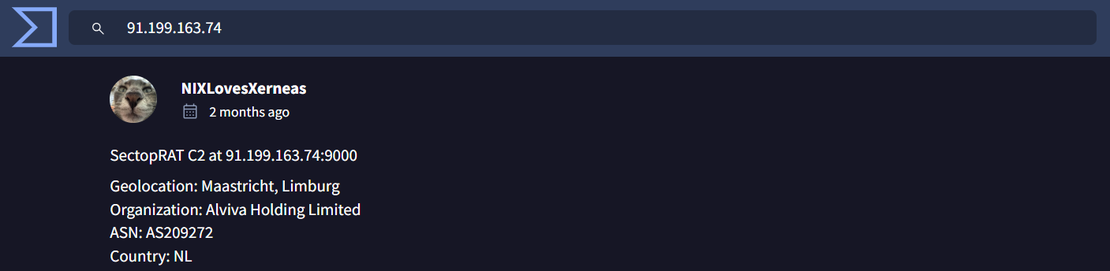
Step 1: An IP address 91.199.163.74 is identified as being linked to SectopRAT malware activity. Upon validation using VirusTotal, the IP is flagged as malicious.
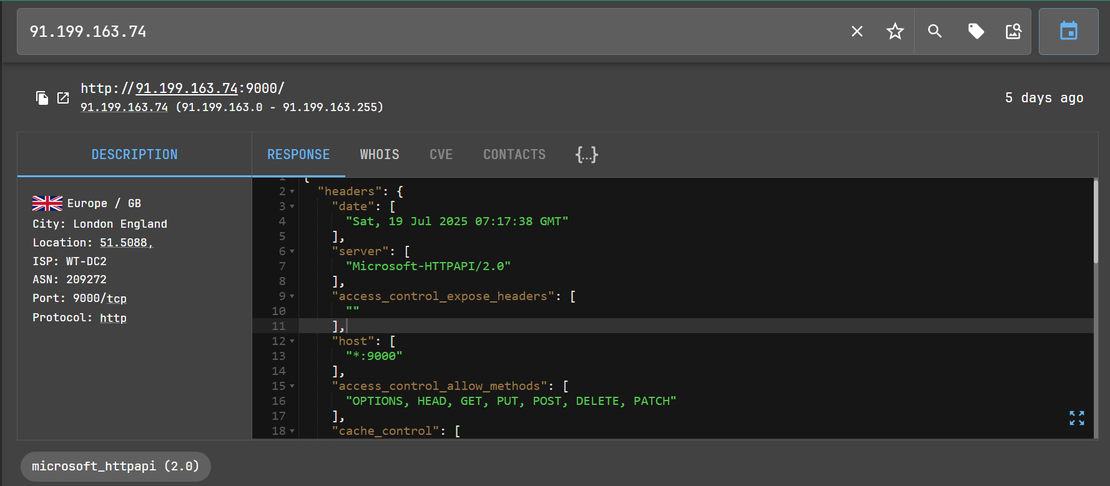
Step 2: Netlas.io reveals notable HTTP response headers and status code patterns on port 9000:
port: 9000- SectopRAT C2 servers commonly expose their interface on port 9000.Server: Microsoft-HTTPAPI/2.0- This specific server header is reused in multiple deployments.Status Code: 404- The C2 often returns a 404 error for unauthorized or default HTTP requests.- The full list of allowed HTTP methods (
OPTIONS,HEAD,GET,PUT,POST,DELETE,PATCH) indicates the same backend stack or framework.
Step 3: By combining these headers, we constructed a Netlas query to hunt down the potentially related cluster.
Constructed Netlas Query:
port:9000 AND http.headers.server:"Microsoft-HTTPAPI/2.0" AND http.status_code:404 AND http.headers.access_control_allow_methods:"OPTIONS, HEAD, GET, PUT, POST, DELETE, PATCH"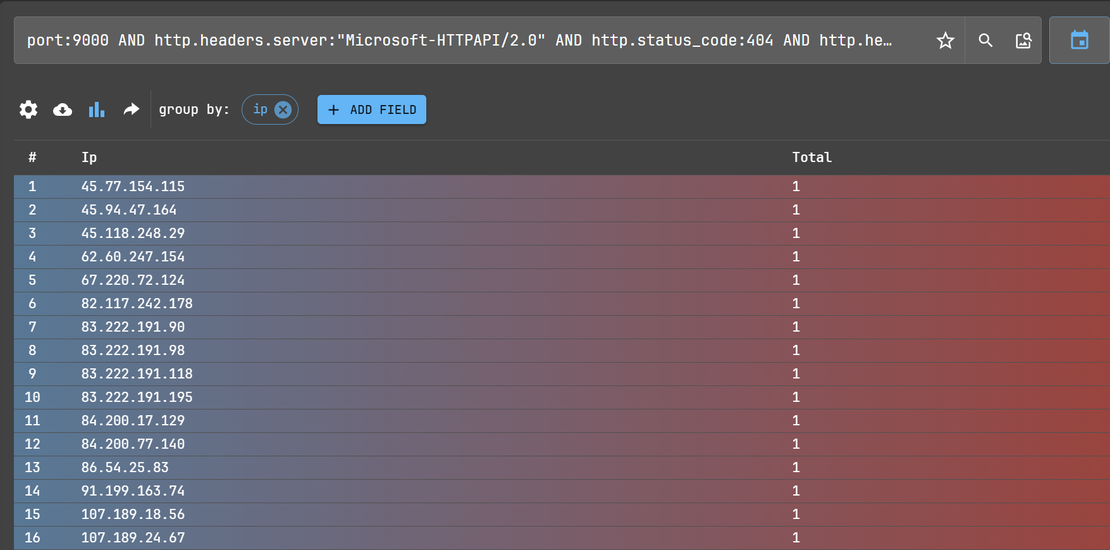
Result: Servers configured similarly, likely operated by the same actor or malware variant, pointing to a broader malicious infrastructure footprint.
Case Study 2: Finding Open Directories Hosting Sliver Client and Other Malicious Tools
Unsecured web directories serve as drop zones for threat actors, often exposing file structures due to default server configurations.
http.title– Detects open directories or misconfigured file listings.http.body– Matches Sliver payload names (executables or client identifiers)
Constructed Netlas Query:
http.title:("Index of" OR "Directory Listing for") AND http.body:("sliver.exe" OR "sliver64.exe" OR "sliver" OR "sliver-c2" OR "sliver-client")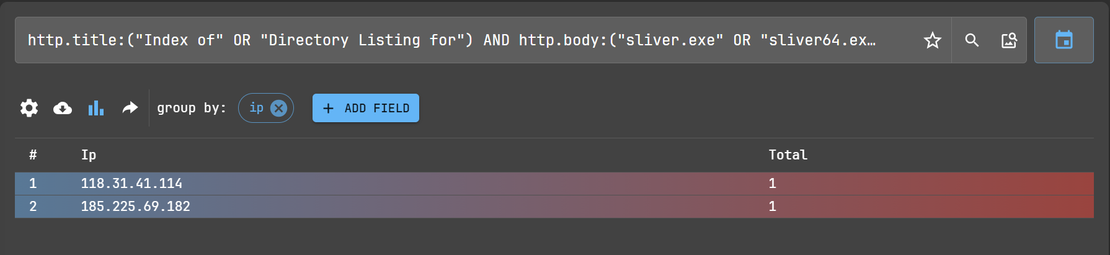

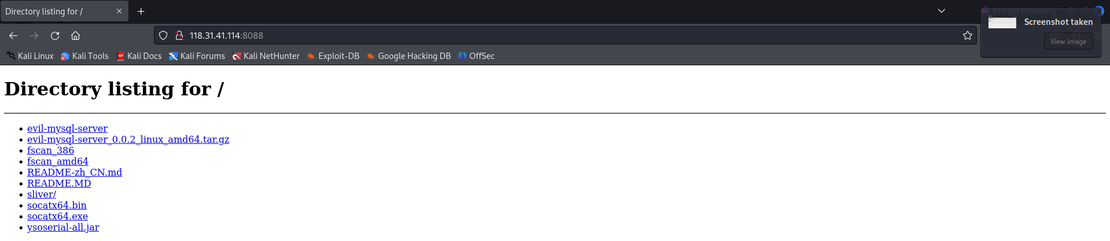
While initial discovery of Sliver C2 payloads was performed using Netlas, by identifying open directories with filenames like sliver-server and sliver-client, we extended this hunting methodology to Censys to uncover similar infrastructure tied to other red teaming and stealer tools.
Censys Query to Discover Malicious Tool Listings:
labels=suspicious-open-dir AND (services.http.response.body: "sliver" OR services.http.response.body: "MimiKatz" OR services.http.response.body: "xworm" OR services.http.response.body: "metasploit")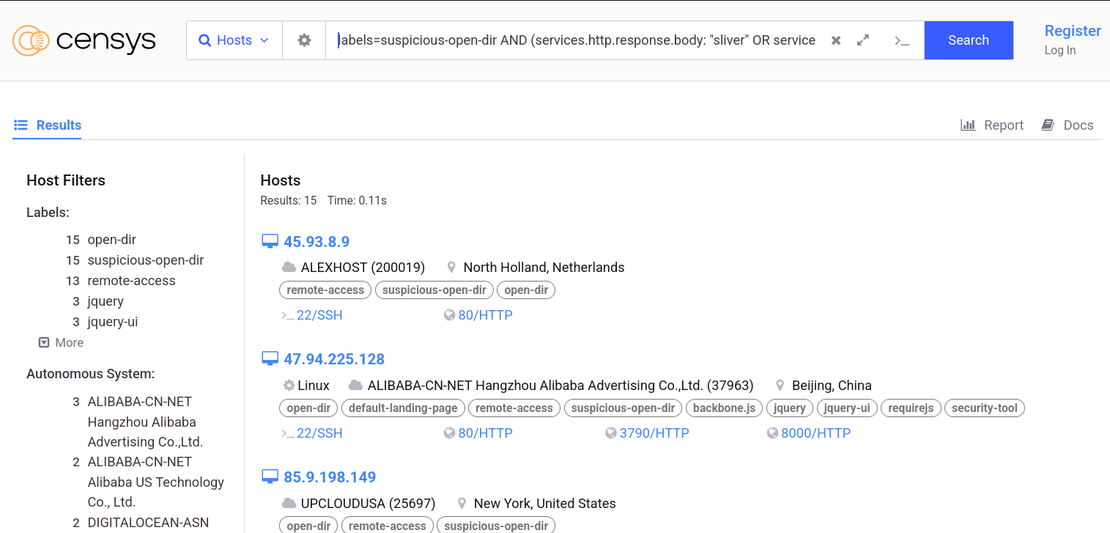
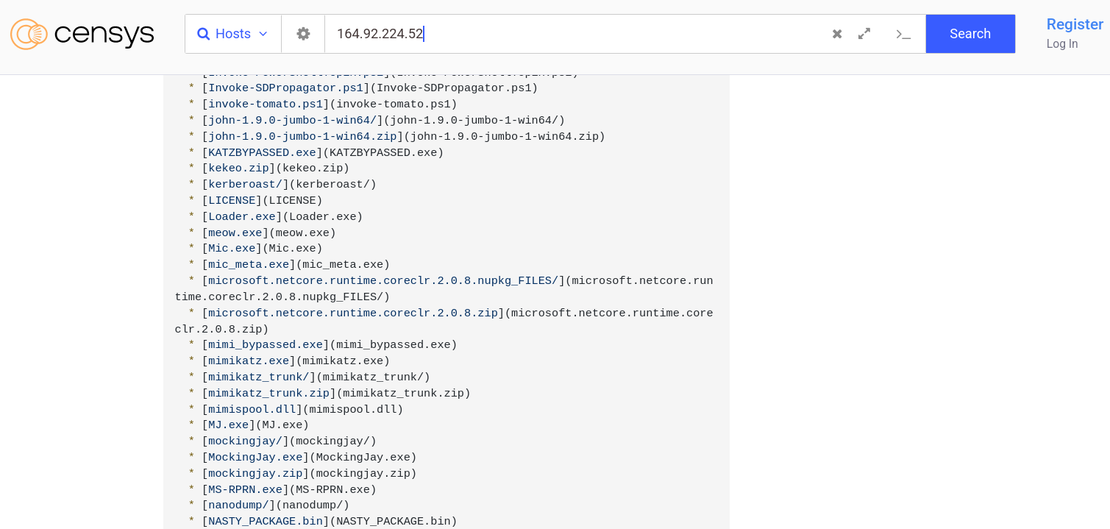
A closer inspection of an open directory hosted at 164.92.224.52 revealed a stash of well-known red teaming and post-exploitation tools.
- The open directory contained notorious offensive security tools, including credential dumpers (Mimikatz, BetterSafetyKatz, nanodump), Kerberos exploit tools (Kekeo, Kerberoast), and stealth execution methods (Mockingjay, Invoke-SDPropagator). AMSI bypasses, AD enumerators, and password crackers (John the Ripper) confirm the server supports post-compromise attack phases.
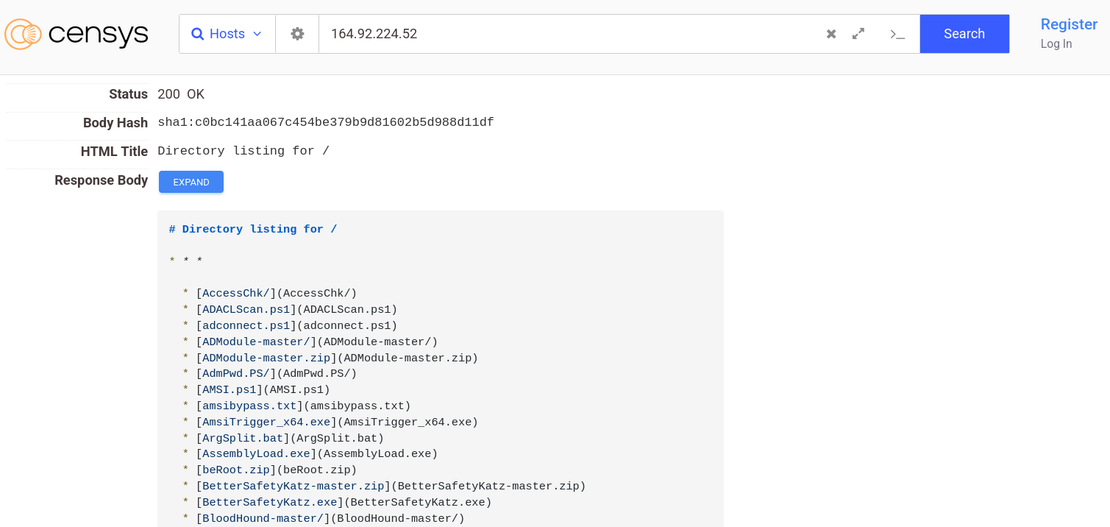
- Threat actors commonly leverage such infrastructure for payload staging, tool hosting, lateral movement, and privilege escalation. The use of obfuscated/EDR-evasive variants underscores malicious intent.
How to Replicate:
- Use labeled datasets: Start with
labels=suspicious-open-dirto filter out endpoints already flagged by Censys for exposing directory listings. - Search for tool-specific keywords: Add terms like
sliver,metasploit,MimiKatz, orxwormin the HTTP response body. These help locate open directories hosting known red teaming or stealer tools. - Look for indexing patterns: Open directories often contain HTML elements like
Index of /orParent Directorywhich are indicative of directory listings. - Detect common file types: You can also include popular payload file extensions such as
.exe,.zip,.ps1, and.batto focus on directories serving binaries or scripts.
Recommended Reading
Netlas vs Censys: Platforms Comparison
Case Study 3: Detecting Hookbot Control Panels
Some C2 panels expose hardcoded HTML page titles that can be searched directly.
http.title – Identifiable title string left unchanged in attacker deployments.
Constructed Netlas Query:
http.title:"HOOKBOT PANEL"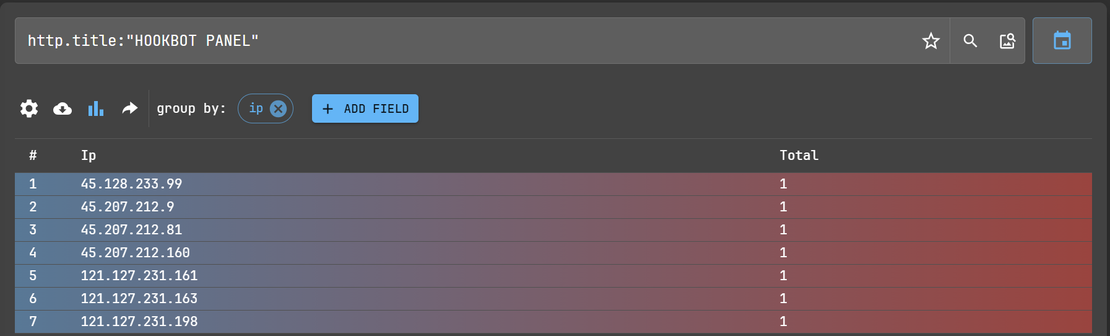
Result: Detects Hookbot C2 admin panels, often tied to active or dormant infrastructure.
Recommended Reading
Hannibal Stealer vs. Browser Security

Case Study 4: Finding Oyster C2 Using HTTP Body Hash
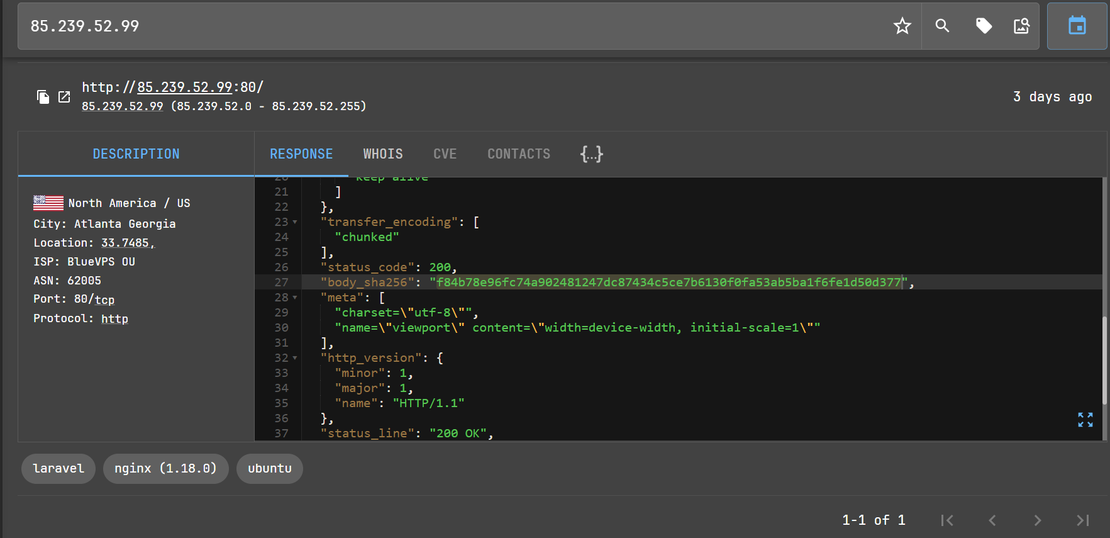
Step 1: An IP address 85.239.52.99 is identified as being linked to Oyster C2.

Step 2: Netlas.io shows a distinctive HTTP body SHA-256 hash:
http.body_sha256– This value represents the SHA-256 hash of the HTTP response body for an Oyster C2 landing page.- Reused payloads or panel pages tend to produce identical body hashes, making this a powerful way to cluster infrastructure.
Constructed Netlas Query:
http.body_sha256:"f84b78e96fc74a902481247dc87434c5ce7b6130f0fa53ab5ba1f6fe1d50d377"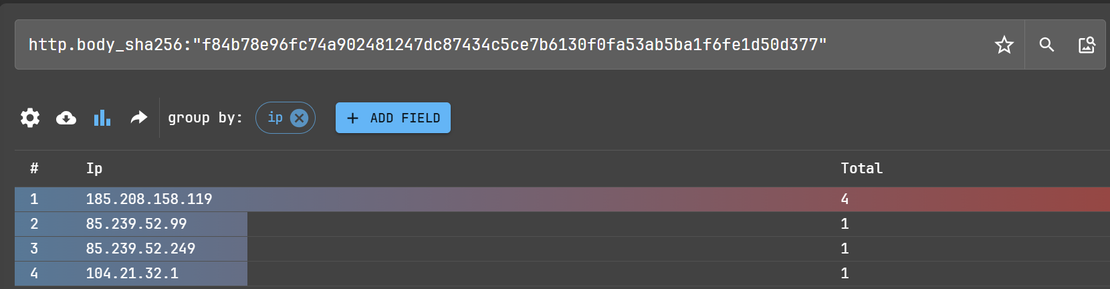
Result: Reveals a cluster of servers using the same static web content, pointing to other C2 nodes or staging infrastructure.
Request Your Free 14-Day Trial
Submit a request to try Netlas free for 14 days with full access to all features.
Analyzing SSL/TLS Certificates
Before TLS encryption is established, the server provides its certificate, which contains its public key and is used to establish an encrypted connection. SSL/TLS certificates contain several attributes, such as the Subject Distinguished Name (DN), Issuer DN, Serial Number, Validity Period, Signature Algorithm, and various extensions, which are commonly used for fingerprinting, especially when self-signed certificates are used.
Unlike certificates issued by trusted Certificate Authorities (CAs), self-signed certificates are manually generated and often contain unique or uncommon metadata. This uniqueness becomes a fingerprint for hunting.
Case Study 1: OrcusRAT
Step 1: To hunt for infrastructure related to OrcusRAT, a known remote access trojan (RAT), we began by searching SSL Blacklist by Abuse.ch, which tracks suspicious and malicious certificates. We observed that many OrcusRAT variants use self-signed certificates where the Issuer DN is set to: "OrcusServerCertificate"
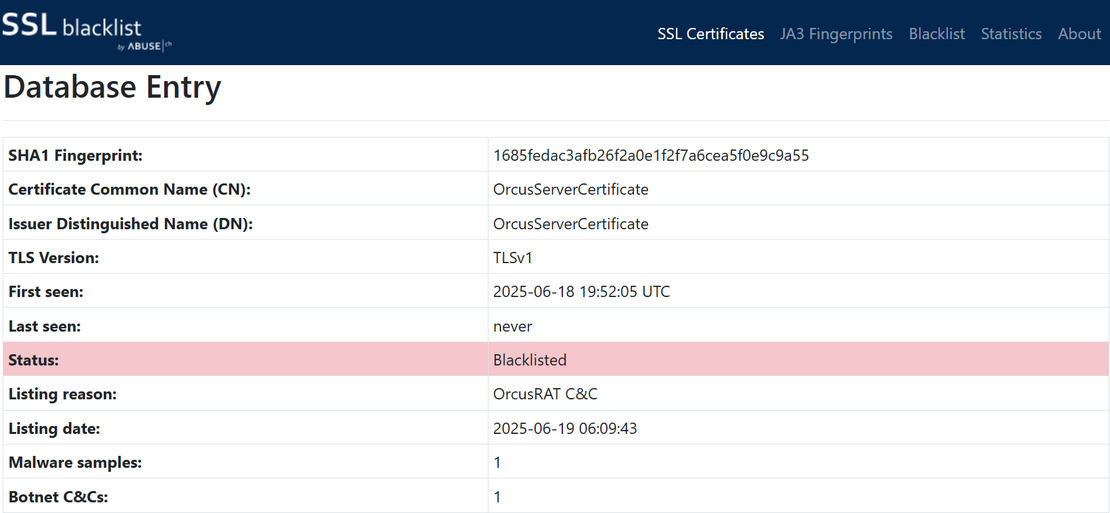
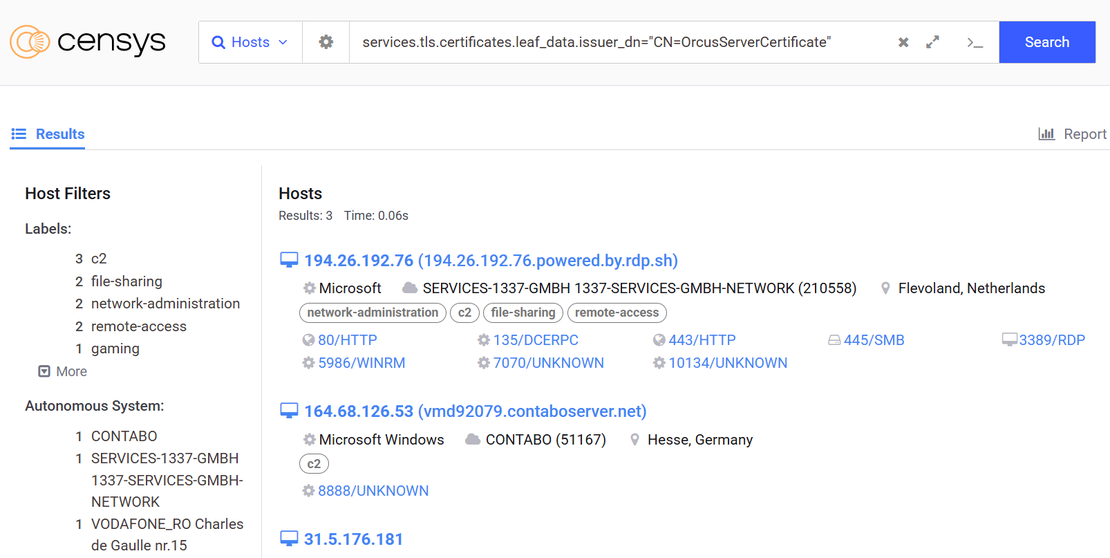
Step 2: This consistent trait enabled us to craft a Censys query to uncover related infrastructure:
services.tls.certificates.leaf_data.issuer_dn="CN=OrcusServerCertificate"Result: Running this query surfaced several potentially related servers exhibiting the same certificate configuration, which is valuable for tracking C2 infrastructure or identifying live command channels.
Case Study 2: BitRAT
Step 1: Similarly, BitRAT infrastructure commonly uses "BitRAT" as the Certificate Issuer CN, allowing defenders to build detection logic based on this trait.

Step 2: This consistent pattern again became a pivot point. We queried Censys using:
services.tls.certificates.leaf_data.issuer_dn="CN=BitRAT”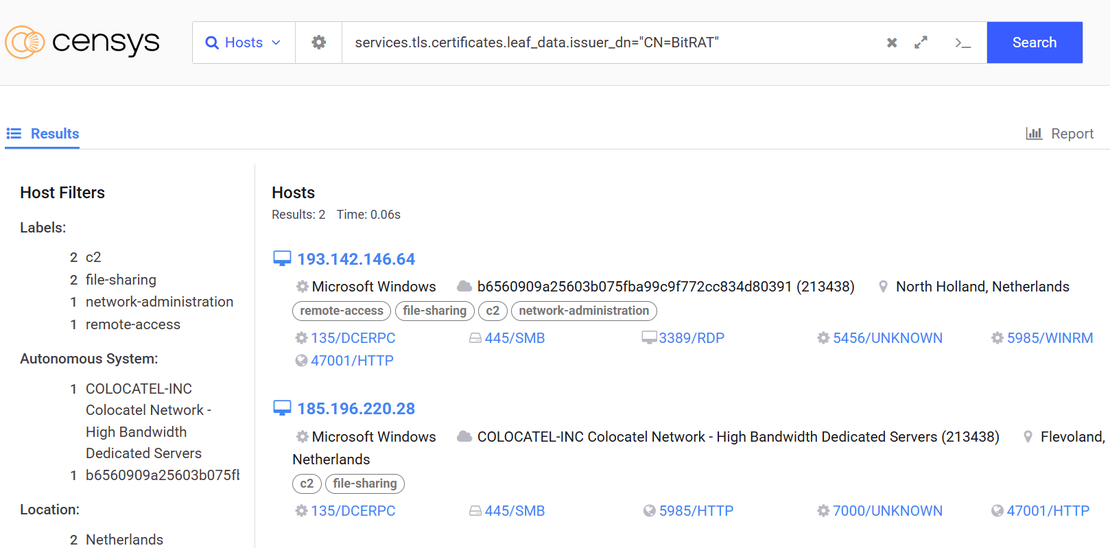
Below is a table summarizing similar patterns observed across different C2 and RAT infrastructures:
| Name | Certificate Pattern Field | Certificate Pattern Value |
|---|---|---|
| Mythic C2 | subject_dn | O=Mythic |
| VenomRAT | subject_dn | CN=VenomRAT |
| AsyncRAT | issuer_dn | CN=AsyncRAT Server |
| Sliver C2 | issuer.common_name | operators |
| Cobalt Strike | issuer.common_name | Major Cobalt Strike |
These easily identifiable fields allow analysts to pivot across different servers or domains that reuse the same certificate metadata, making it possible to uncover broader infrastructure clusters linked to a single tool or threat actor.
Mining Offensive Framework Source Code for Hardcoded Indicators
Many modern C2 frameworks used by red teams and threat actors alike are published as open-source projects. By reviewing these projects, defenders can extract unique headers or behaviors that help identify exposed or misused infrastructure.
To get started:
- Explore the official repositories (e.g., GitHub) of popular frameworks like Havoc or Pyramid C2.
- Useful files often include:
readme.md,wiki.md,*.css,settings.py,config.json, custom HTML error pages, etc.
Below, we demonstrate this approach using two widely known frameworks: Havoc and Pyramid C2.
Case Study 1: Havoc C2
Havoc is a modern, open-source C2 framework used for post-exploitation, red teaming, and adversary simulation. Its GitHub repository provides clear documentation of the listener behavior.
How to Analyze:
- Visit: github.com/HavocFramework/Havoc
- Open the
WIKI.MDfile. - Under the Listener Configuration section, you’ll find default header values used in C2 communication:
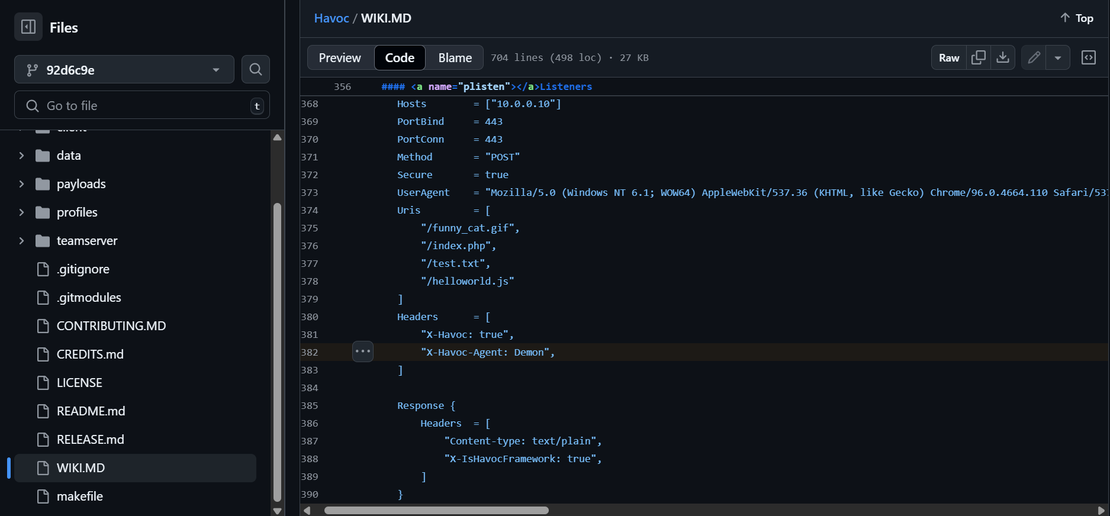
Netlas Search Query to Detect Havoc Servers:
This query searches for HTTP servers responding with the X_Havoc header – potentially identifying exposed or misconfigured Havoc infrastructure.
http.unknown_headers.key:"X_Havoc"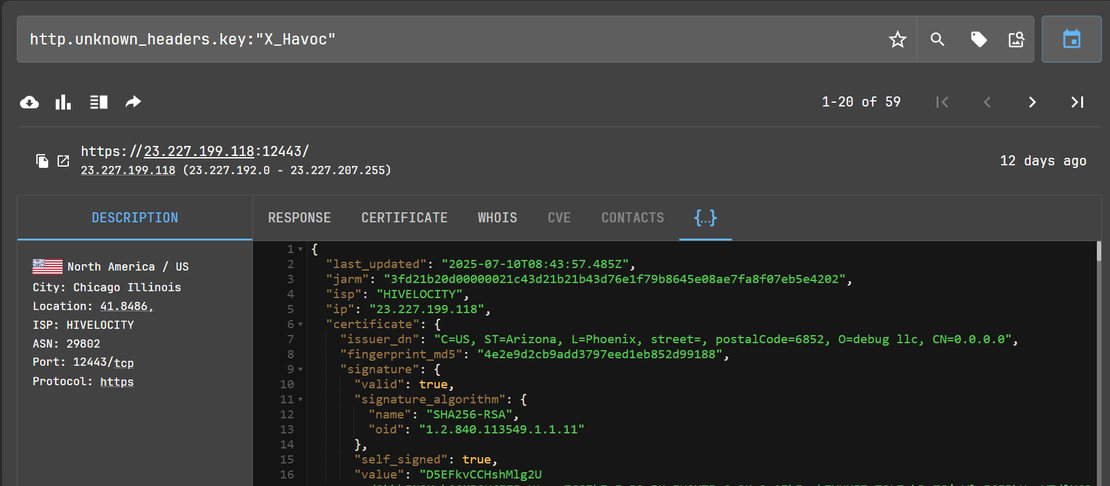
By grouping the results by IP, we were able to see the related IP cluster:

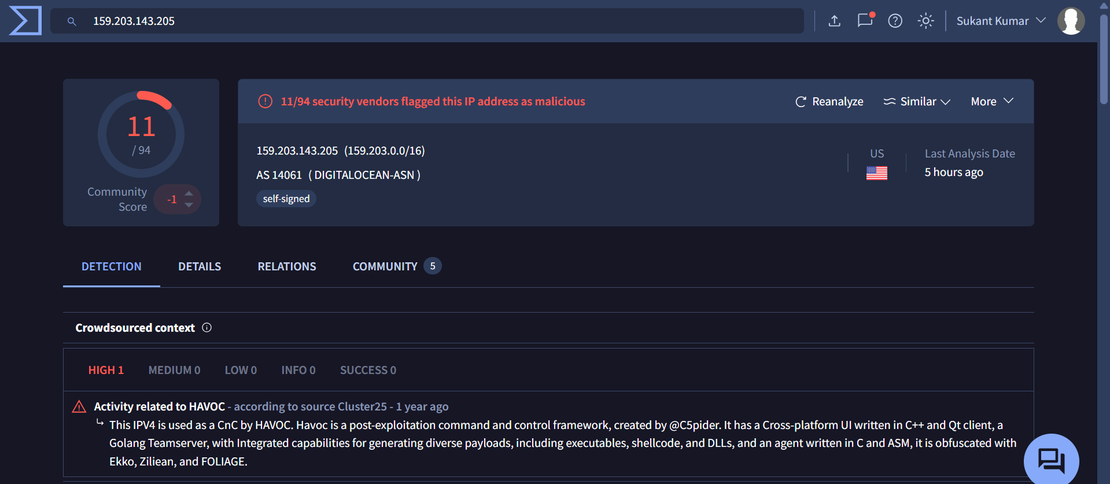
VirusTotal analysis for one of the IP addresses from the cluster:
Case Study 2: Pyramid C2 – Identifying Authentication Headers
Pyramid C2 is a Python-based post-exploitation framework. Its server-side logic includes custom authentication behavior that can be fingerprinted in threat hunting.
How to Analyze:
- Visit: https://github.com/naksyn/Pyramid
- Open the main file:
pyramid.py - In the HTTP server logic (based on Python’s
BaseHTTPRequestHandler), you’ll find:
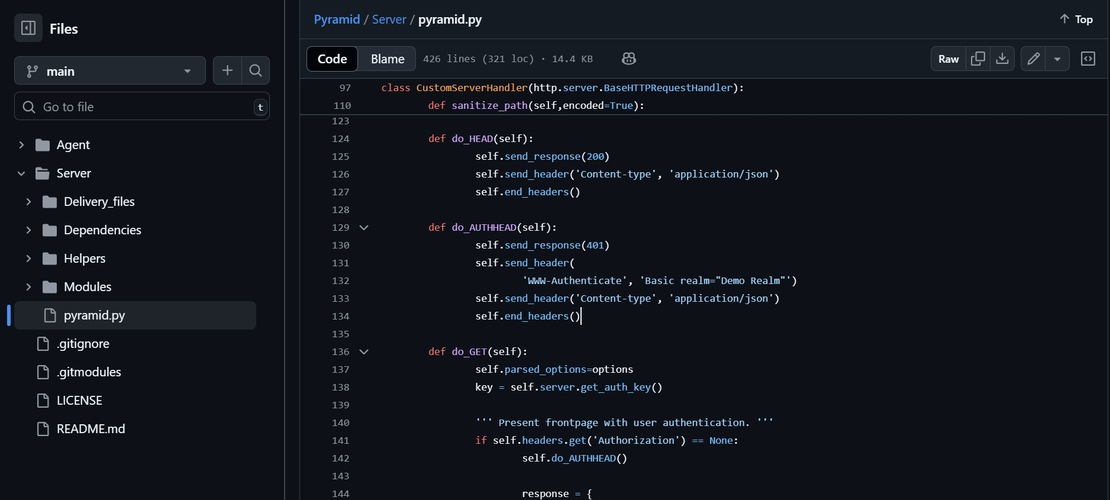
This default authentication challenge string is a unique and easily searchable indicator.
Netlas Search Query to Detect Pyramid Servers: The Netlas query below helps locate any servers exposing Pyramid’s default authentication header.
http.headers.www_authenticate:"Basic realm=\"Demo Realm\""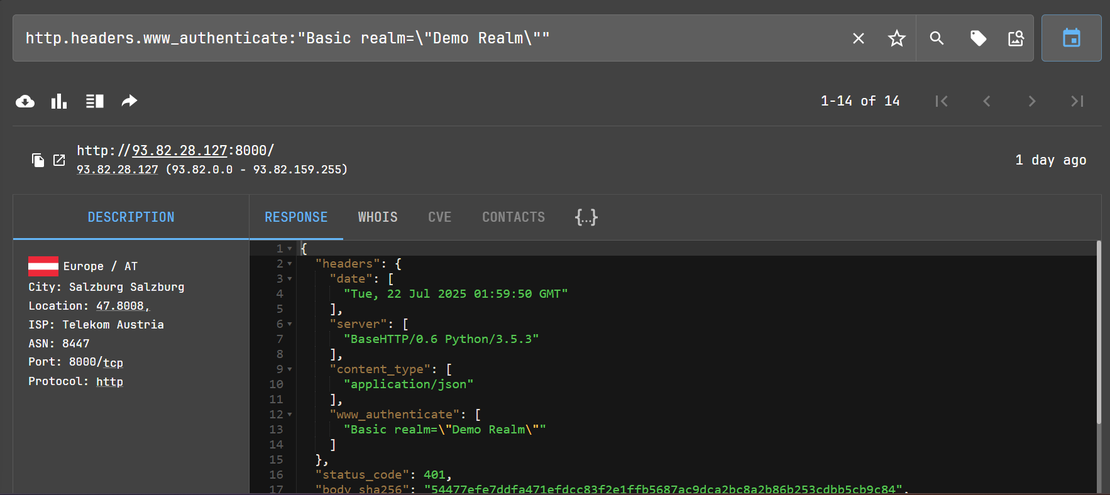
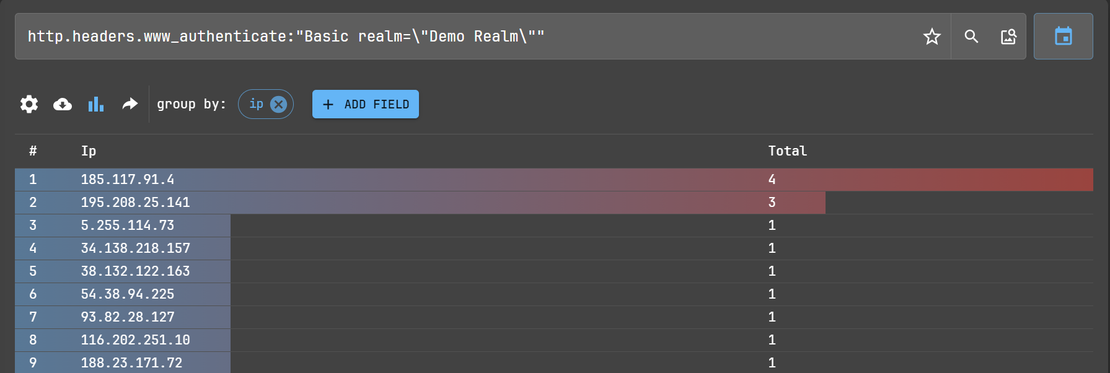
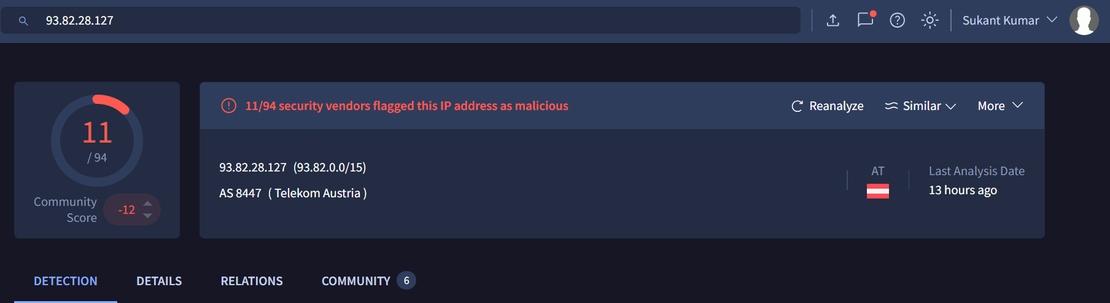
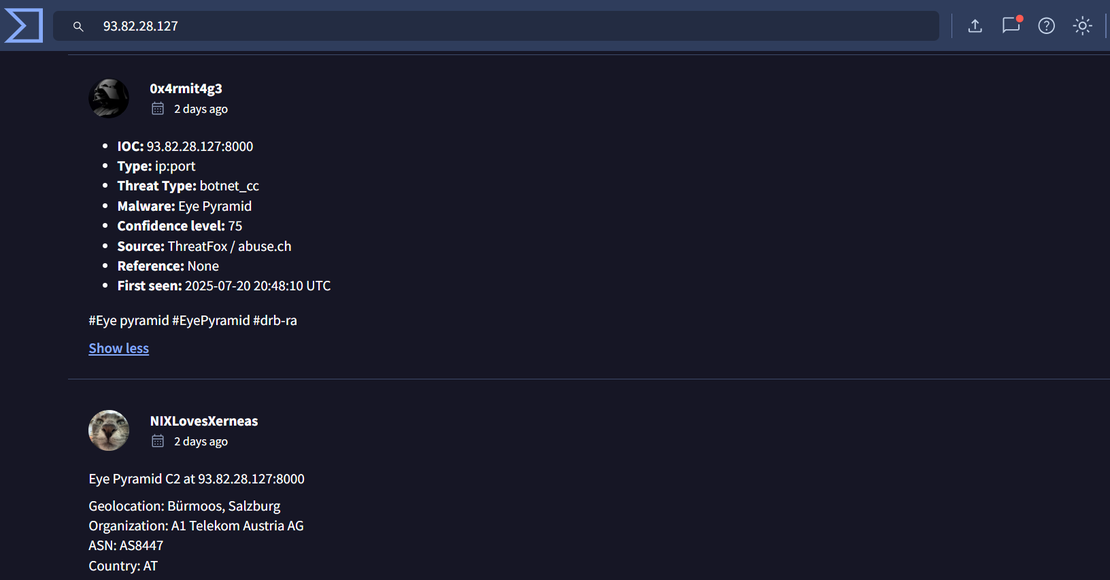
VirusTotal analysis of one of the IP addresses from the cluster:
Clustering Adversary Servers with Favicon Hashes
Favicons, the small icons shown in browser tabs, can act as subtle but powerful indicators when tracking attacker-controlled infrastructure. Since many threat actors reuse favicon.ico files across multiple systems, such as phishing pages or C2 servers, these icons often generate consistent hash values.
This behavior can create a unique fingerprint that can be used to detect other systems controlled by the same actor. Unlike broad heuristics, hash-based detection offers high precision, helping analysts minimize false positives. With just one hash, it is possible to uncover a larger network of related domains and IP addresses, making favicon hashes a fast and efficient pivot point in threat hunting workflows.
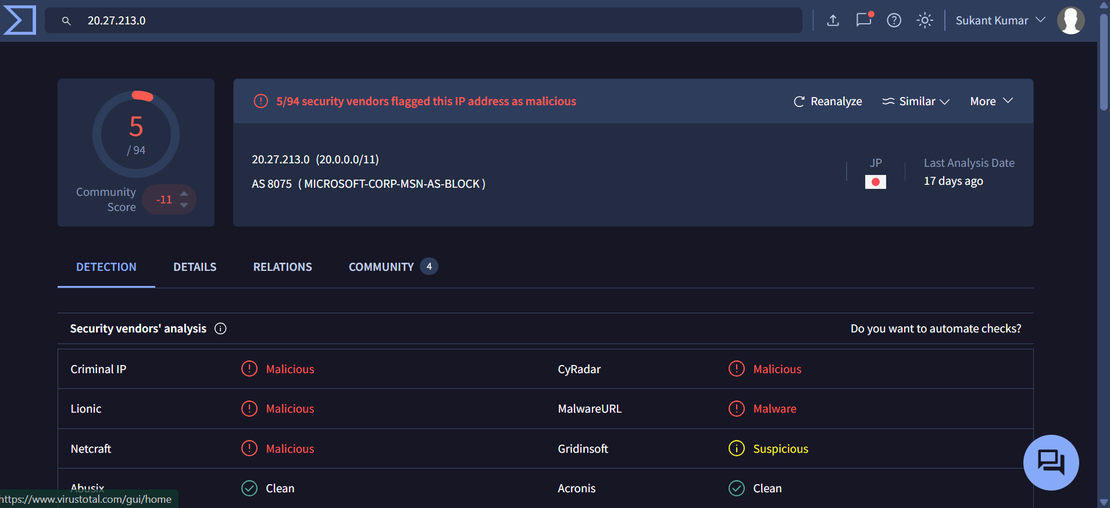
To illustrate, begin with a suspicious IP address that has been confirmed as malicious using a threat intelligence platform such as VirusTotal.
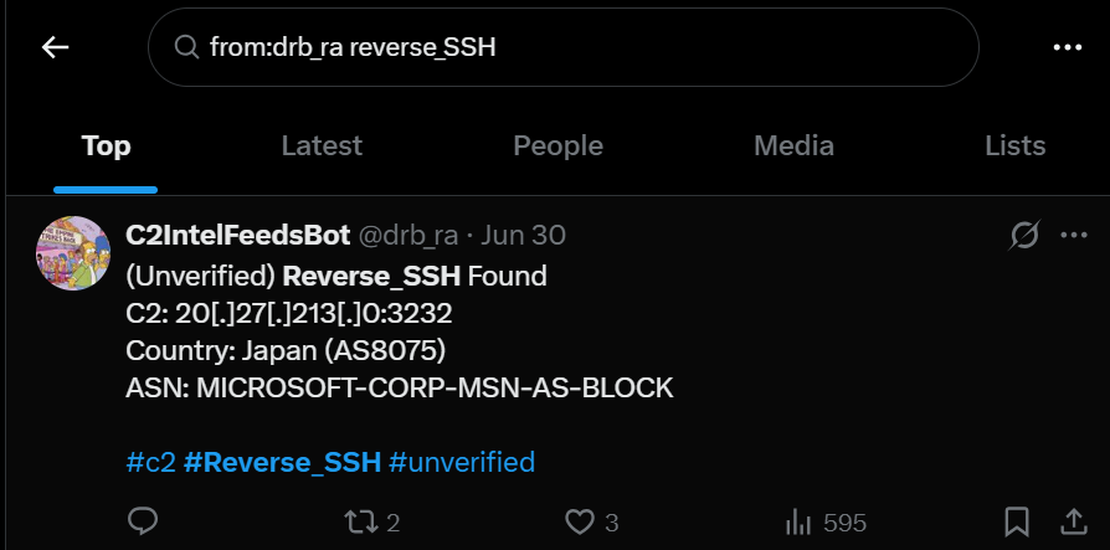
Step 1: Starting point: from:drb_ra reverse_SSH
VirusTotal analysis of the IP address from X:
Step 2: Next, inspect the IP on urlscan.io and navigate to the HTTP transactions section.
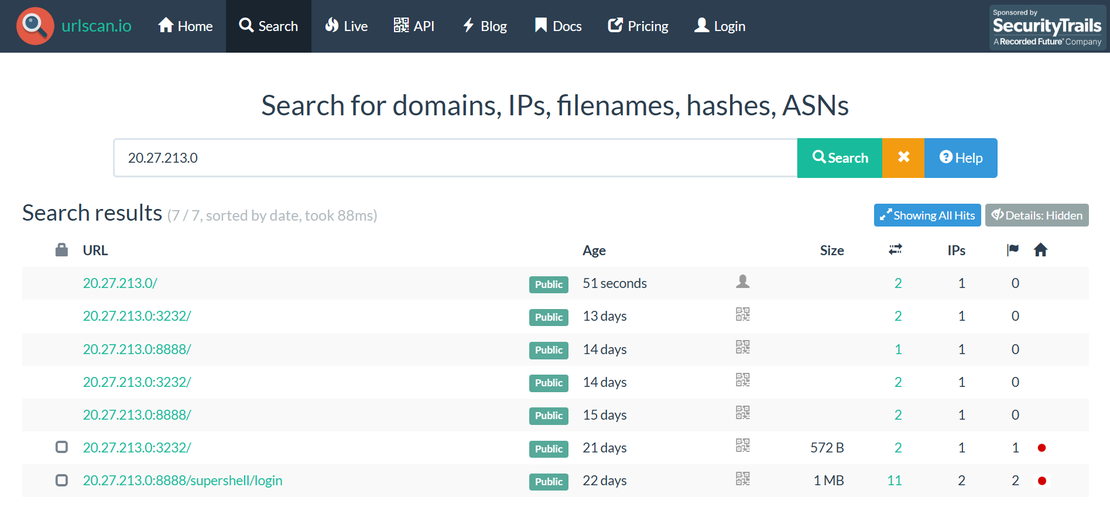
If a request for favicon.ico is observed, extract the associated SHA-256 hash of the favicon file.
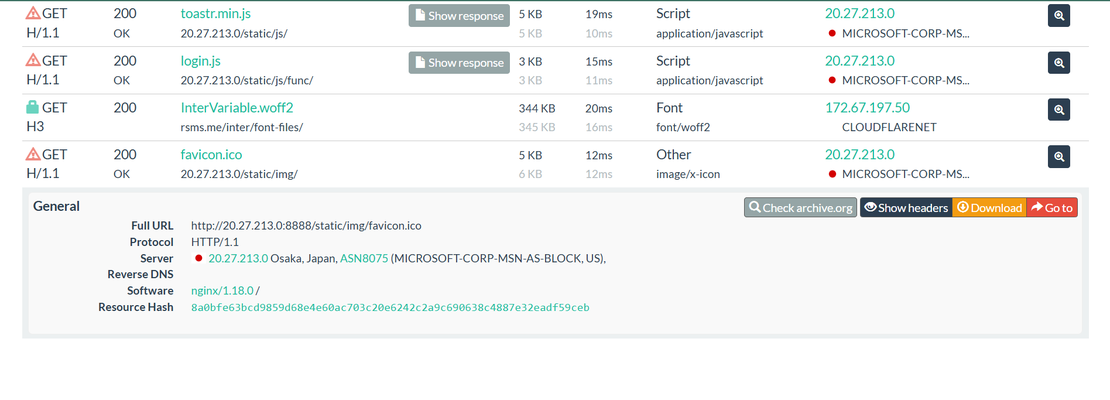
Step 3: This resource (favicon) hash can then be used as a pivot point. Search the hash on Netlas.io using a dork like:
http.favicon.hash_sha256:8a0bfe63bcd9859d68e4e60ac703c20e6242c2a9c690638c4887e32eadf59ceb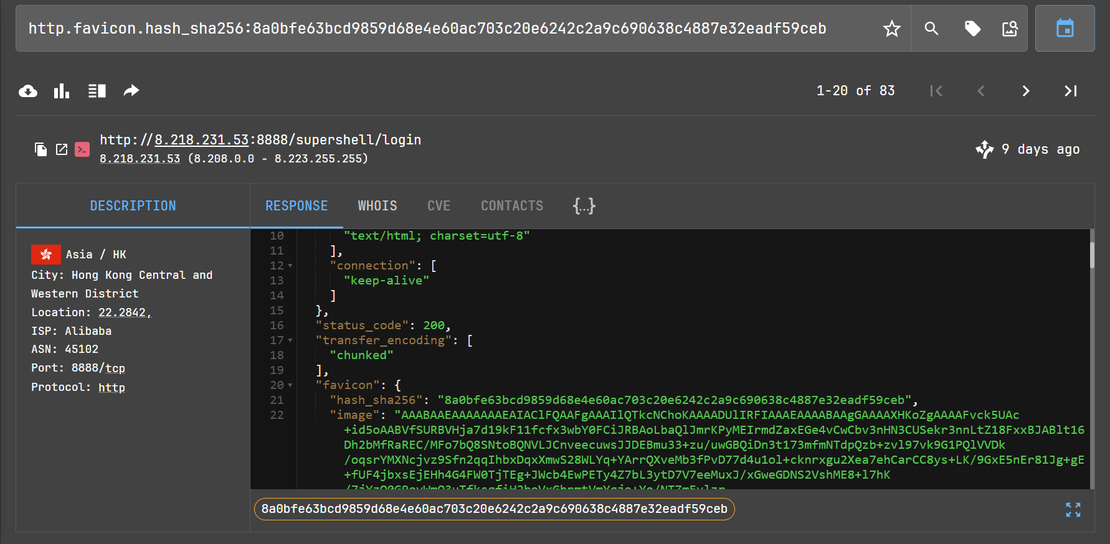
Supershell Login Panel:

Step 4: By grouping the search results by IP and path, we can observe a cluster of malicious IP addresses pointing to Supershell login paths.
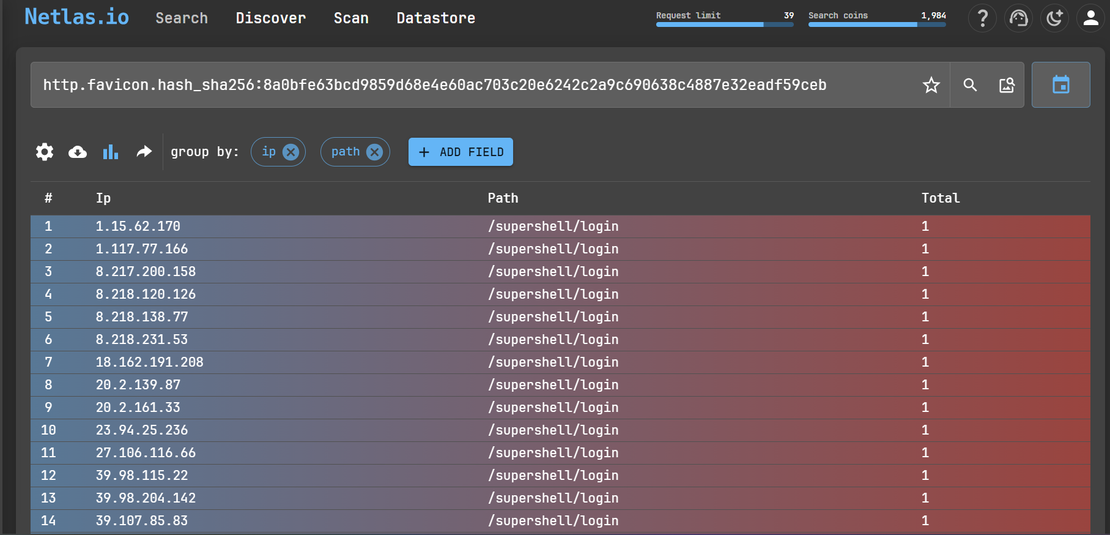
This type of search often reveals clusters of infrastructure, indicating potential connections between malicious servers.
Identifying Infrastructure Using JARM Fingerprints
JARM is a TLS fingerprinting technique developed by Salesforce that helps identify servers based on their TLS configuration and behavior. Each server responds to a series of custom TLS Client Hello messages, and the response pattern is hashed to generate a unique JARM fingerprint.
This technique is particularly useful in hunting and clustering C2 infrastructure built with a unique or rare SSL/TLS stack. JARM fingerprints can reveal infrastructure operated by the same malware family or threat group even when the network indicators differ.
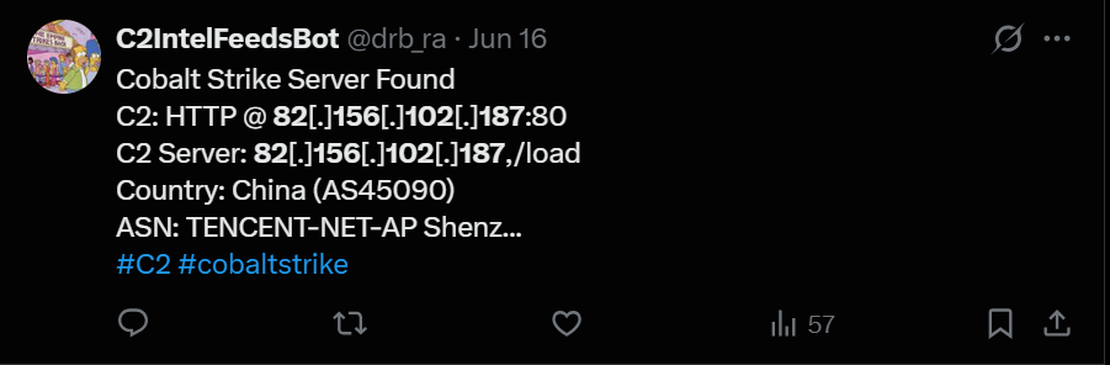
Case Study: Hunting Cobalt Strike Infrastructure
Step 1: An IP address 82.156.102.187 is suspected to be associated with Cobalt Strike.
Step 2: When checked on VirusTotal, a JARM fingerprint was identified:
2ad2ad16d2ad2ad00042d42d00042ddb04deffa1705e2edc44cae1ed24a4da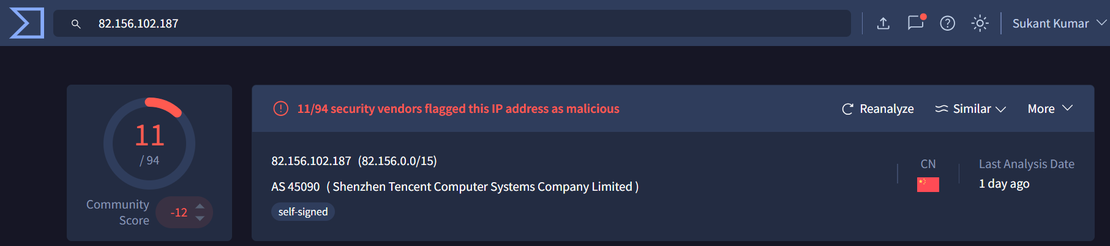

Step 3: Searching for this JARM fingerprint on Shodan returned over 7,000 results. Constructed Shodan query:
ssl.jarm:"2ad2ad16d2ad2ad00042d42d00042ddb04deffa1705e2edc44cae1ed24a4da”
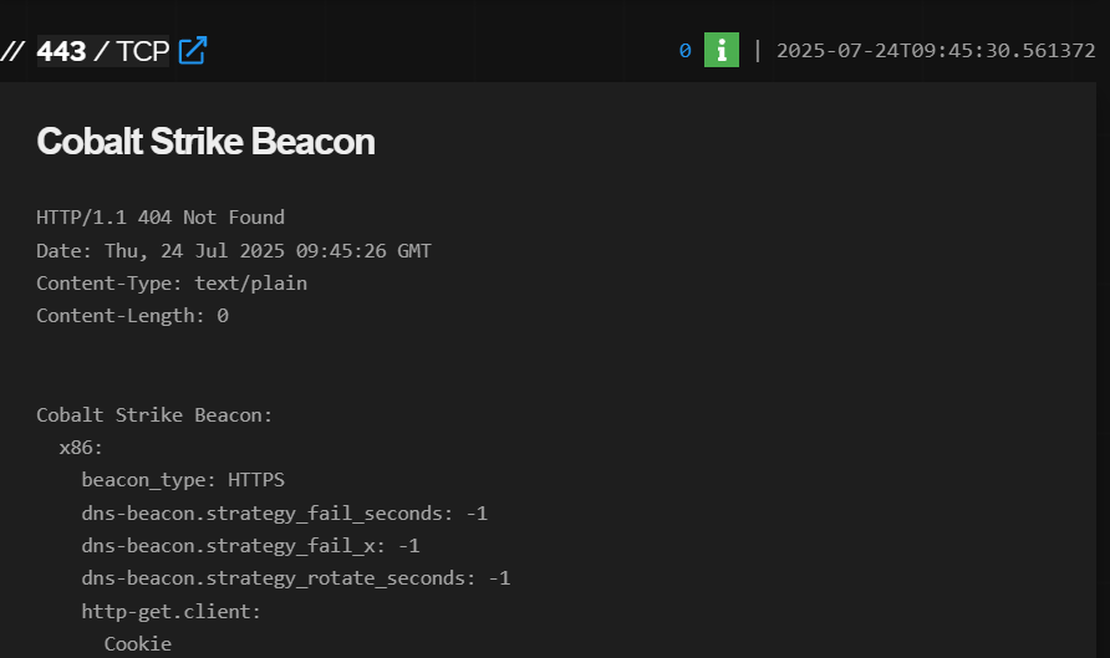
Step 4: Upon searching the malicious IP address on Shodan, a detailed review of the HTTP HTML hash, HTTP response, and SSL information from the same IP revealed:
http.html_hash:0HTTP/1.1 404 Not FoundContent-Type: text/plainContent-Length: 0SSL public key size: 2048-bit
Step 5: These details were combined into a refined Shodan query:
Constructed Shodan query:
ssl.jarm:"2ad2ad16d2ad2ad00042d42d00042ddb04deffa1705e2edc44cae1ed24a4da" http.html_hash:0 HTTP/1.1 404 Not Found Content-Type: text/plain Content-Length: 0 ssl:2048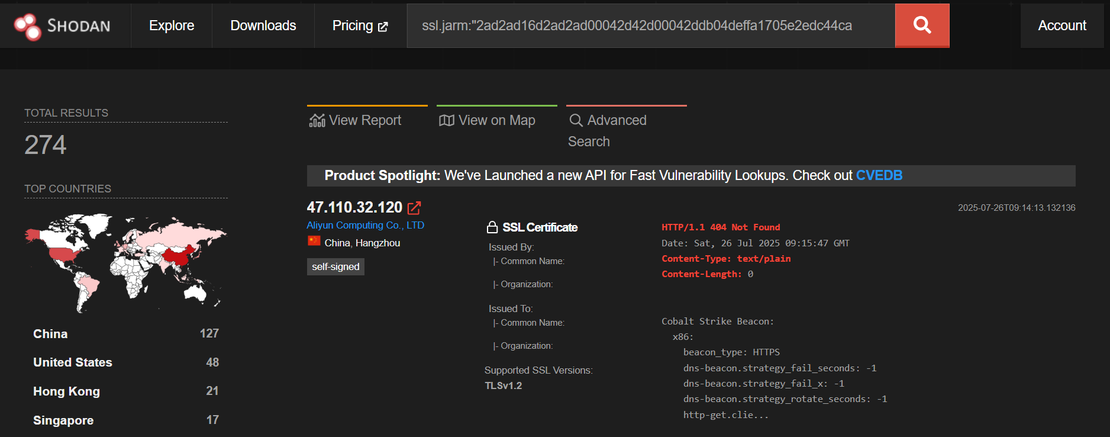
This reduced the result set to 274 hosts.
To further reduce noise, facet analysis in Shodan was leveraged:
- Certificate Issuer CNs (Common Names) were reviewed.
- Uncommon issuers such as
"query.com",“www.bing.com”,“Google”, and"Microsoft Windows"stood out. These could be deliberate attempts to mimic legitimate metadata to evade detection or appear trustworthy.
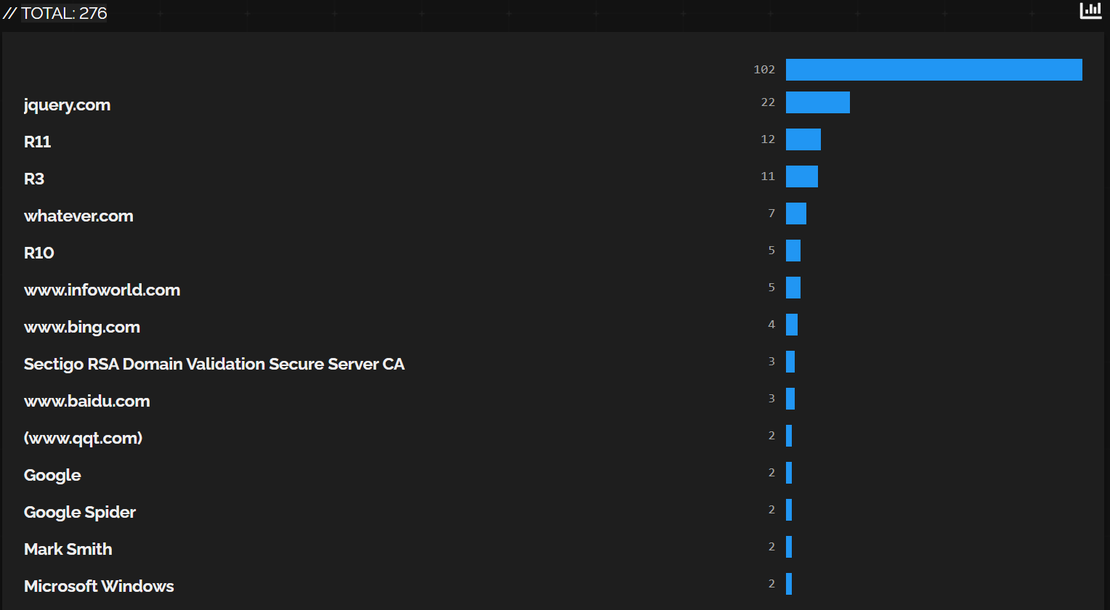
jquery.comis not a legitimate Certificate Authority. It is often observed in self-signed certificates used by malware C2 servers. Its presence indicates likely misuse and should be treated as suspicious when seen in unknown infrastructure.
Constructed Shodan query:
ssl.jarm:"2ad2ad16d2ad2ad00042d42d00042ddb04deffa1705e2edc44cae1ed24a4da" http.html_hash:0 HTTP/1.1 404 Not Found Content-Type: text/plain Content-Length: 0 ssl:2048 ssl.cert.issuer.cn:"jquery.com"
- Attackers use
Googleas the issuer CN to mimic legitimate traffic and blend into expected telemetry. This tactic is frequently observed in commodity RAT infrastructure.
Constructed Shodan query:
ssl.jarm:"2ad2ad16d2ad2ad00042d42d00042ddb04deffa1705e2edc44cae1ed24a4da" http.html_hash:0 HTTP/1.1 404 Not Found Content-Type: text/plain Content-Length: 0 ssl:2048 ssl.cert.issuer.cn:"Google"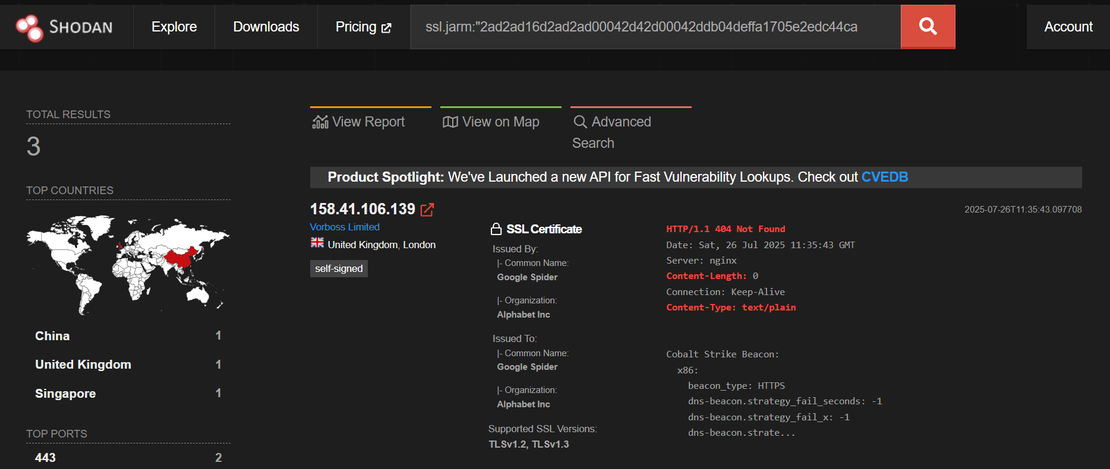
- Though it looks like a trusted name,
Microsoft Windowsas an issuer CN in a certificate is non-standard. It is often used by attackers to appear trustworthy, especially in campaigns abusing SSL/TLS configurations.
Constructed Shodan query:
ssl.jarm:"2ad2ad16d2ad2ad00042d42d00042ddb04deffa1705e2edc44cae1ed24a4da" http.html_hash:0 HTTP/1.1 404 Not Found Content-Type: text/plain Content-Length: 0 ssl:2048 ssl.cert.issuer.cn:"Microsoft Windows"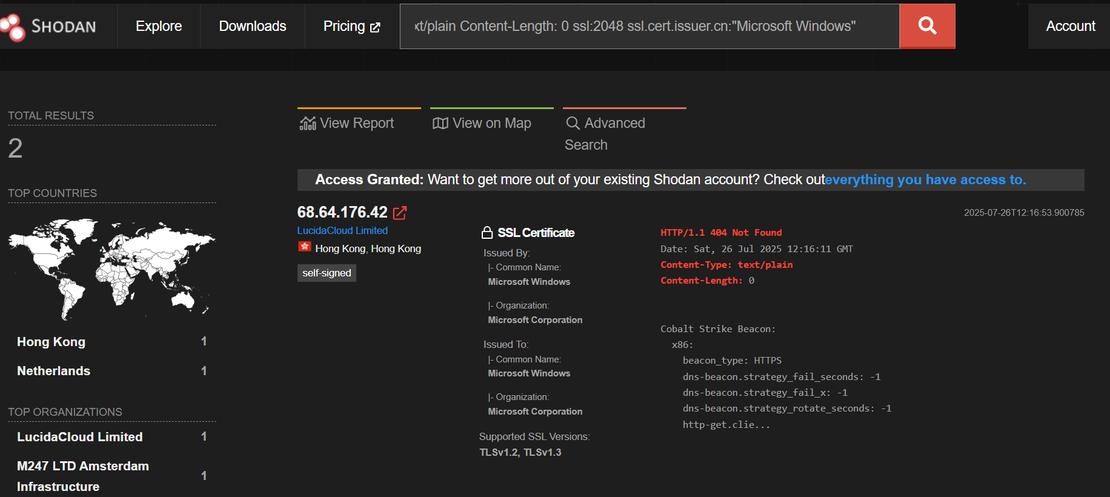
Takeaway: By combining JARM, HTTP response details, SSL key attributes, and certificate metadata, researchers can pivot from a single IOC to a broader infrastructure cluster. While JARM helps group similar setups, it’s critical to refine results using layered indicators and metadata analysis to filter out benign servers.
Recommended Reading
Netlas vs Shodan: Platforms Comparison
Final Thoughts on Hunting Malicious Infrastructure
Threat actors fundamentally depend on infrastructure components to maintain their malicious activities. The good news is that we can track this infrastructure using attributes such as unique certificate values, JARM hashes, HTTP body hashes, and favicons.
We demonstrated practical, actionable techniques for pivoting across these digital artifacts, supported by real-world case studies. A critical defensive insight is reinforced here: no single indicator is definitive. However, strategically combining multiple signals and applying contextual filtering significantly reduces false positives and sharply improves detection accuracy.
The use of modern IoT search platforms helps track malicious infrastructure across the entire Internet.
The key takeaway for defenders is the power of a proactive hunting mindset: by leveraging the right queries and techniques, even small clues sourced publicly (e.g., from X or abuse.ch) can unravel entire malicious ecosystems. This proactive discovery empowers defenders to disrupt attacks earlier, dismantle attacker operations at scale, and stay ahead of the threat.
Please let me know in the comments if any parts of this post need further clarification or detail. Thank you for reading!

Book Your Netlas Demo
Chat with our team to explore how the Netlas platform can support your security research and threat analysis.
Related Posts

February 12, 2025
Netlas vs Censys: Platforms Comparison

November 21, 2024
Netlas vs Shodan: Platforms Comparison

July 25, 2025
The Pyramid of Pain: Beyond the Basics

May 31, 2025
TAI Challenge 2025 Recap

June 25, 2025
Modern Cybercrime: Who’s Behind It and Who’s Stopping It

June 5, 2025
Netlas vs Urlscan: Tools Comparison